> ## Documentation Index
> Fetch the complete documentation index at: https://docs.polymarket.com/llms.txt
> Use this file to discover all available pages before exploring further.
# 钱包与身份验证
> 连接或创建用于交易的 Polymarket 账户。
首先确定账户的钱包类型。然后,你可以连接现有的 Polymarket 账户,或为用户创建新账户。
## 钱包类型
存款钱包(Deposit Wallet)是 Polymarket 交易使用的默认智能钱包。钱包类型取决于账户钱包的创建方式和时间。
| 钱包类型 | 适用情况 |
| ------------------ | ------------------------------------------------------- |
| **Deposit Wallet** | 2026 年 5 月 4 日或之后部署的所有 Polymarket 账户钱包均使用此类型。 |
| **Proxy Wallet** | 通过 polymarket.com 上的 Magic Link 或 Google 身份验证创建的旧版智能钱包。 |
| **Safe Wallet** | 使用 MetaMask 或 Rabby Wallet 等外部签名者创建的旧版智能钱包。 |
## 连接你的账户
连接现有的 polymarket.com 账户,以使用其中的资金和仓位进行交易。从个人资料菜单复制账户钱包地址:
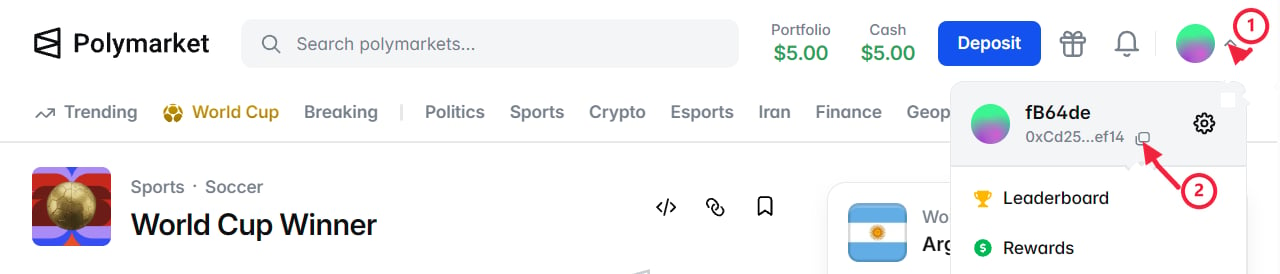
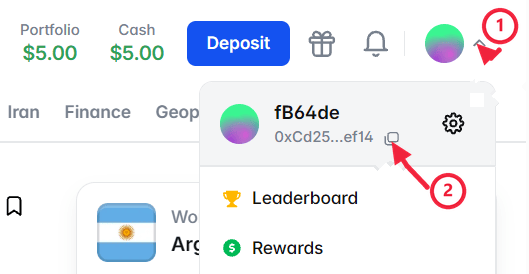 在 polymarket.com → Settings → API Keys → Relayer API Keys 下创建 Relayer API 密钥:
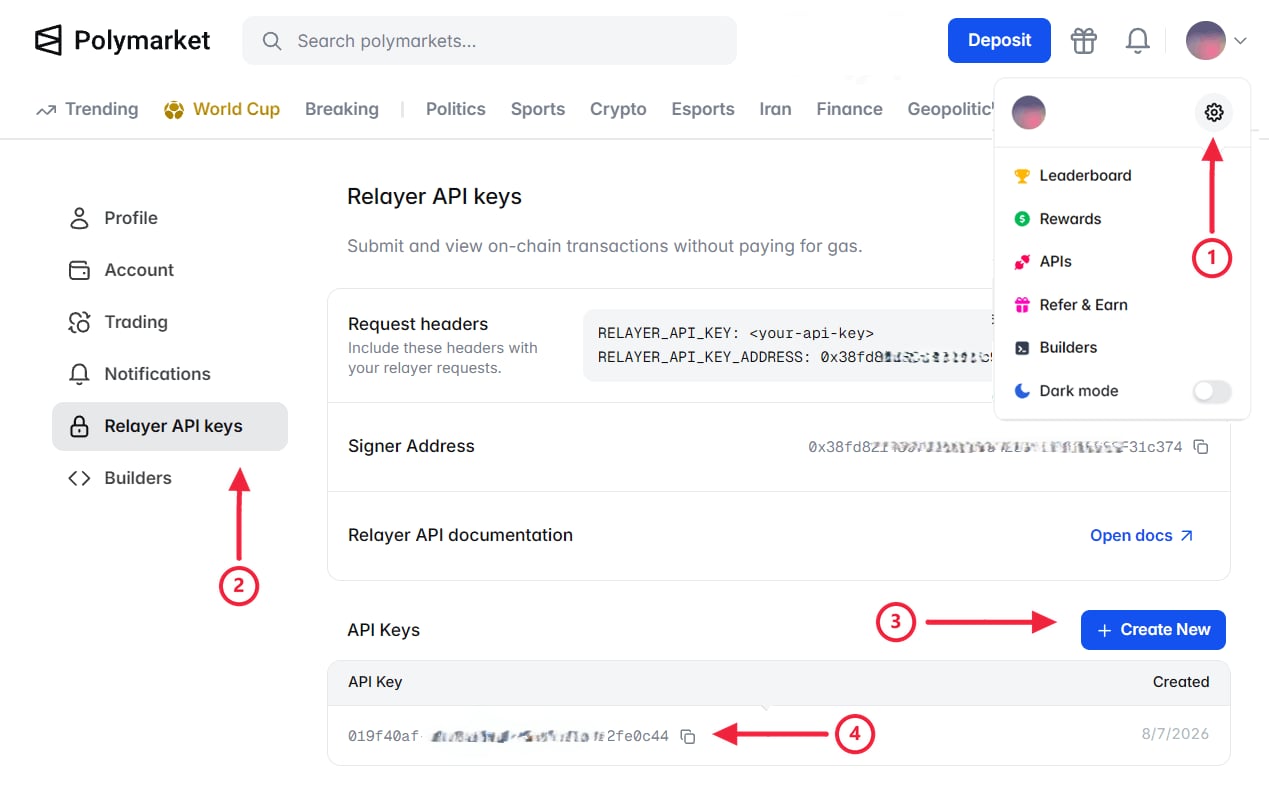 此密钥授权账户执行免 Gas 钱包操作。复制创建后显示的 **Signer Address** 和 **API Key**。
准备好钱包地址和 Relayer API 密钥后,使用 `createSecureClient` 连接账户。
首先,提供签名者和账户钱包。包含 Relayer API 密钥,以授权免 Gas 钱包操作。
```ts theme={null}
import { createSecureClient, relayerApiKey } from "@polymarket/client";
import { privateKey } from "@polymarket/client/viem";
const client = await createSecureClient({
wallet: process.env.POLYMARKET_WALLET_ADDRESS,
signer: privateKey(process.env.SIGNER_PRIVATE_KEY),
apiKey: relayerApiKey({
key: process.env.RELAYER_API_KEY!,
address: process.env.RELAYER_API_KEY_ADDRESS!,
}),
});
```
此示例使用 Viem
和私钥。要连接其他受支持钱包库中的签名者,请参阅[钱包集成](/cn/getting-started/typescript#钱包集成)。
然后,检查解析出的账户身份和钱包类型。
`client.account` 包含当前会话的签名者、账户钱包和钱包类型。
```ts AccountIdentity Type theme={null}
type AccountIdentity = {
signer: EvmAddress;
wallet: EvmAddress;
walletType: WalletType;
};
enum WalletType {
EOA = 0,
POLY_PROXY = 1,
GNOSIS_SAFE = 2,
DEPOSIT_WALLET = 3,
}
```
```json AccountIdentity Example theme={null}
{
"signer": "0x8f3cf7ad23cd3cadbd9735aff958023239c6a063",
"wallet": "0x2e234dae75c793f67a35089c9d99245e1c58470b",
"walletType": 3
}
```
至此,你已成功连接账户。
准备好钱包地址和 Relayer API 密钥后,使用 `AsyncSecureClient.create` 连接账户(同步工作流可使用 `SecureClient.create`)。
首先,使用私钥和账户钱包创建 `AsyncSecureClient` 或 `SecureClient`。包含 Relayer API 密钥,以授权免 Gas 钱包操作。
```python Async theme={null}
import os
from polymarket import AsyncSecureClient, RelayerApiKey
client = await AsyncSecureClient.create(
private_key=os.environ["SIGNER_PRIVATE_KEY"],
wallet=os.environ["POLYMARKET_WALLET_ADDRESS"],
api_key=RelayerApiKey(
key=os.environ["POLYMARKET_RELAYER_API_KEY"],
address=os.environ["POLYMARKET_RELAYER_API_KEY_ADDRESS"],
),
)
```
```python Sync theme={null}
import os
from polymarket import RelayerApiKey, SecureClient
client = SecureClient.create(
private_key=os.environ["SIGNER_PRIVATE_KEY"],
wallet=os.environ["POLYMARKET_WALLET_ADDRESS"],
api_key=RelayerApiKey(
key=os.environ["POLYMARKET_RELAYER_API_KEY"],
address=os.environ["POLYMARKET_RELAYER_API_KEY_ADDRESS"],
),
)
```
然后,检查解析出的账户钱包和钱包类型。
`client.wallet` 和 `client.wallet_type` 包含当前会话中解析出的账户钱包和钱包类型。
```python Async theme={null}
EvmAddress = NewType("EvmAddress", str)
WalletType: TypeAlias = Literal["EOA", "POLY_PROXY", "GNOSIS_SAFE", "DEPOSIT_WALLET"]
class AsyncSecureClient:
wallet: EvmAddress
wallet_type: WalletType
```
```python Sync theme={null}
EvmAddress = NewType("EvmAddress", str)
WalletType: TypeAlias = Literal["EOA", "POLY_PROXY", "GNOSIS_SAFE", "DEPOSIT_WALLET"]
class SecureClient:
wallet: EvmAddress
wallet_type: WalletType
```
至此,你已成功连接账户。
通过 CLOB 进行身份验证并创建 L2 凭据。
首先,创建 L1 签名以证明签名者地址的所有权。完整签名流程请参阅 [API 身份验证](/cn/getting-started/api#身份验证)。
```json clobAuthTypedData theme={null}
{
"domain": {
"name": "ClobAuthDomain",
"version": "1",
"chainId": 137
},
"types": {
"ClobAuth": [
{ "name": "address", "type": "address" },
{ "name": "timestamp", "type": "string" },
{ "name": "nonce", "type": "uint256" },
{ "name": "message", "type": "string" }
]
},
"primaryType": "ClobAuth",
"message": {
"address": "",
"timestamp": "",
"nonce": "",
"message": "This message attests that I control the given wallet"
}
}
```
使用控制 `` 的签名者对 `clobAuthTypedData` 进行签名。返回的签名为 ``。
然后,将签名者地址、时间戳、nonce 和 L1 签名发送到 CLOB,以创建 L2 凭据。
```bash Create theme={null}
curl -X POST "https://clob.polymarket.com/auth/api-key" \
-H "POLY_ADDRESS: " \
-H "POLY_SIGNATURE: " \
-H "POLY_TIMESTAMP: " \
-H "POLY_NONCE: "
```
```bash Derive theme={null}
curl "https://clob.polymarket.com/auth/derive-api-key" \
-H "POLY_ADDRESS: " \
-H "POLY_SIGNATURE: " \
-H "POLY_TIMESTAMP: " \
-H "POLY_NONCE: "
```
保存返回的 L2 凭据,用于验证私有请求,包括下单请求:
```json Response theme={null}
{
"apiKey": "",
"secret": "",
"passphrase": ""
}
```
至此,你已成功连接账户。
## 创建新账户
创建一个 polymarket.com 账户作为 Builder 账户。它代表你的集成,并拥有用于为用户创建存款钱包的 Builder 资料和 API 凭据。每个钱包仍由其签名者控制。
在 Builder 账户中,打开 polymarket.com → Settings → Builders 并创建 API 密钥:
此密钥授权账户执行免 Gas 钱包操作。复制创建后显示的 **Signer Address** 和 **API Key**。
准备好钱包地址和 Relayer API 密钥后,使用 `createSecureClient` 连接账户。
首先,提供签名者和账户钱包。包含 Relayer API 密钥,以授权免 Gas 钱包操作。
```ts theme={null}
import { createSecureClient, relayerApiKey } from "@polymarket/client";
import { privateKey } from "@polymarket/client/viem";
const client = await createSecureClient({
wallet: process.env.POLYMARKET_WALLET_ADDRESS,
signer: privateKey(process.env.SIGNER_PRIVATE_KEY),
apiKey: relayerApiKey({
key: process.env.RELAYER_API_KEY!,
address: process.env.RELAYER_API_KEY_ADDRESS!,
}),
});
```
此示例使用 Viem
和私钥。要连接其他受支持钱包库中的签名者,请参阅[钱包集成](/cn/getting-started/typescript#钱包集成)。
然后,检查解析出的账户身份和钱包类型。
`client.account` 包含当前会话的签名者、账户钱包和钱包类型。
```ts AccountIdentity Type theme={null}
type AccountIdentity = {
signer: EvmAddress;
wallet: EvmAddress;
walletType: WalletType;
};
enum WalletType {
EOA = 0,
POLY_PROXY = 1,
GNOSIS_SAFE = 2,
DEPOSIT_WALLET = 3,
}
```
```json AccountIdentity Example theme={null}
{
"signer": "0x8f3cf7ad23cd3cadbd9735aff958023239c6a063",
"wallet": "0x2e234dae75c793f67a35089c9d99245e1c58470b",
"walletType": 3
}
```
至此,你已成功连接账户。
准备好钱包地址和 Relayer API 密钥后,使用 `AsyncSecureClient.create` 连接账户(同步工作流可使用 `SecureClient.create`)。
首先,使用私钥和账户钱包创建 `AsyncSecureClient` 或 `SecureClient`。包含 Relayer API 密钥,以授权免 Gas 钱包操作。
```python Async theme={null}
import os
from polymarket import AsyncSecureClient, RelayerApiKey
client = await AsyncSecureClient.create(
private_key=os.environ["SIGNER_PRIVATE_KEY"],
wallet=os.environ["POLYMARKET_WALLET_ADDRESS"],
api_key=RelayerApiKey(
key=os.environ["POLYMARKET_RELAYER_API_KEY"],
address=os.environ["POLYMARKET_RELAYER_API_KEY_ADDRESS"],
),
)
```
```python Sync theme={null}
import os
from polymarket import RelayerApiKey, SecureClient
client = SecureClient.create(
private_key=os.environ["SIGNER_PRIVATE_KEY"],
wallet=os.environ["POLYMARKET_WALLET_ADDRESS"],
api_key=RelayerApiKey(
key=os.environ["POLYMARKET_RELAYER_API_KEY"],
address=os.environ["POLYMARKET_RELAYER_API_KEY_ADDRESS"],
),
)
```
然后,检查解析出的账户钱包和钱包类型。
`client.wallet` 和 `client.wallet_type` 包含当前会话中解析出的账户钱包和钱包类型。
```python Async theme={null}
EvmAddress = NewType("EvmAddress", str)
WalletType: TypeAlias = Literal["EOA", "POLY_PROXY", "GNOSIS_SAFE", "DEPOSIT_WALLET"]
class AsyncSecureClient:
wallet: EvmAddress
wallet_type: WalletType
```
```python Sync theme={null}
EvmAddress = NewType("EvmAddress", str)
WalletType: TypeAlias = Literal["EOA", "POLY_PROXY", "GNOSIS_SAFE", "DEPOSIT_WALLET"]
class SecureClient:
wallet: EvmAddress
wallet_type: WalletType
```
至此,你已成功连接账户。
通过 CLOB 进行身份验证并创建 L2 凭据。
首先,创建 L1 签名以证明签名者地址的所有权。完整签名流程请参阅 [API 身份验证](/cn/getting-started/api#身份验证)。
```json clobAuthTypedData theme={null}
{
"domain": {
"name": "ClobAuthDomain",
"version": "1",
"chainId": 137
},
"types": {
"ClobAuth": [
{ "name": "address", "type": "address" },
{ "name": "timestamp", "type": "string" },
{ "name": "nonce", "type": "uint256" },
{ "name": "message", "type": "string" }
]
},
"primaryType": "ClobAuth",
"message": {
"address": "",
"timestamp": "",
"nonce": "",
"message": "This message attests that I control the given wallet"
}
}
```
使用控制 `` 的签名者对 `clobAuthTypedData` 进行签名。返回的签名为 ``。
然后,将签名者地址、时间戳、nonce 和 L1 签名发送到 CLOB,以创建 L2 凭据。
```bash Create theme={null}
curl -X POST "https://clob.polymarket.com/auth/api-key" \
-H "POLY_ADDRESS: " \
-H "POLY_SIGNATURE: " \
-H "POLY_TIMESTAMP: " \
-H "POLY_NONCE: "
```
```bash Derive theme={null}
curl "https://clob.polymarket.com/auth/derive-api-key" \
-H "POLY_ADDRESS: " \
-H "POLY_SIGNATURE: " \
-H "POLY_TIMESTAMP: " \
-H "POLY_NONCE: "
```
保存返回的 L2 凭据,用于验证私有请求,包括下单请求:
```json Response theme={null}
{
"apiKey": "",
"secret": "",
"passphrase": ""
}
```
至此,你已成功连接账户。
## 创建新账户
创建一个 polymarket.com 账户作为 Builder 账户。它代表你的集成,并拥有用于为用户创建存款钱包的 Builder 资料和 API 凭据。每个钱包仍由其签名者控制。
在 Builder 账户中,打开 polymarket.com → Settings → Builders 并创建 API 密钥:
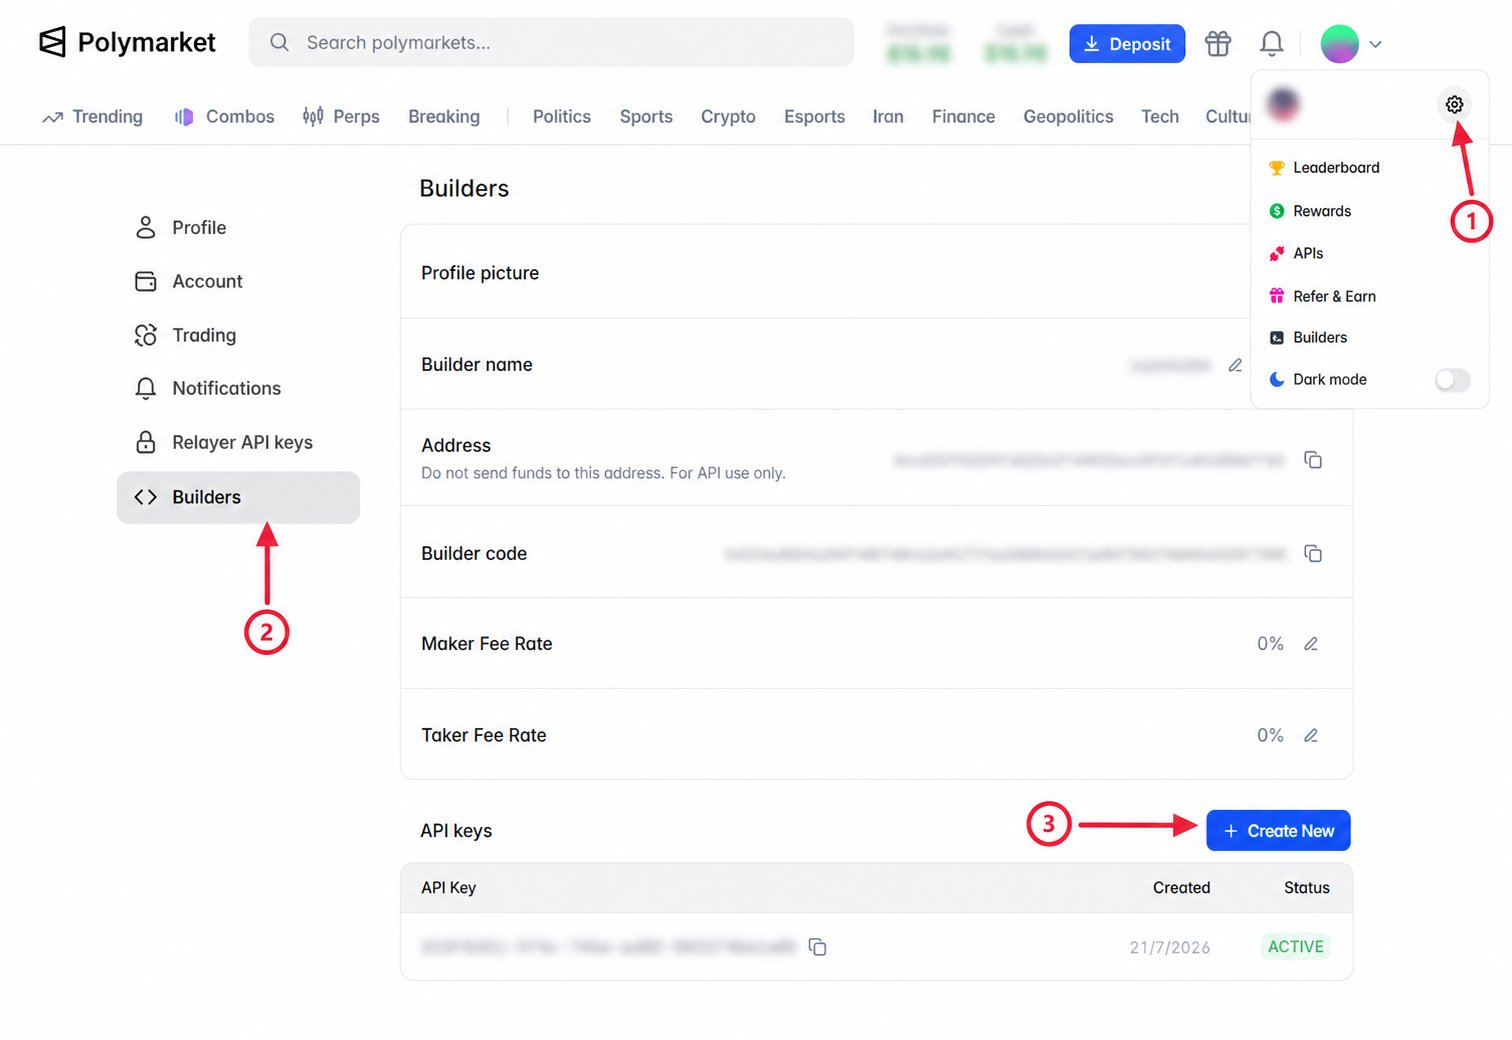
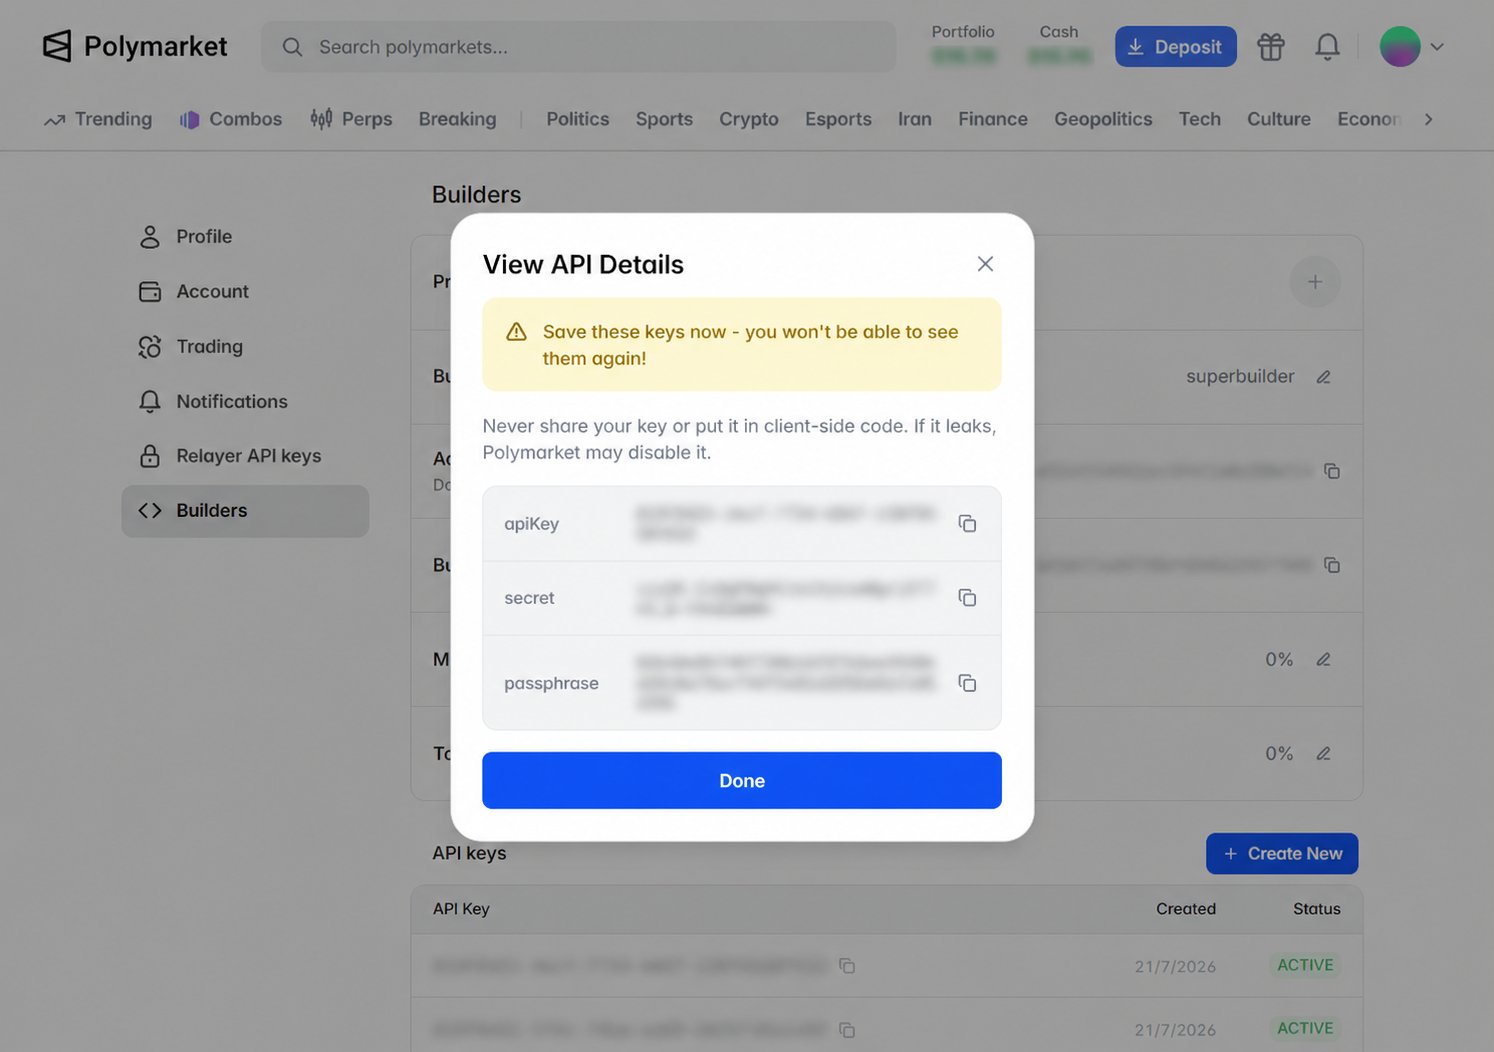 复制创建后显示的 **API Key**、**Secret** 和 **Passphrase**。
Builder API 凭据属于敏感信息。请将其保存在服务器上,切勿公开或分享。
准备好 Builder API 密钥后,使用 `createSecureClient` 创建新账户。
首先,使用签名者和 Builder API 密钥创建 `SecureClient`。SDK 会派生签名者的存款钱包地址并自动部署该钱包。
```ts theme={null}
import { createSecureClient } from "@polymarket/client";
import { builderApiKey } from "@polymarket/client/node";
import { privateKey } from "@polymarket/client/viem";
const client = await createSecureClient({
signer: privateKey(process.env.SIGNER_PRIVATE_KEY),
apiKey: builderApiKey({
key: process.env.POLYMARKET_BUILDER_API_KEY!,
secret: process.env.POLYMARKET_BUILDER_SECRET!,
passphrase: process.env.POLYMARKET_BUILDER_PASSPHRASE!,
}),
});
```
此示例使用 Viem
和私钥。要连接其他受支持钱包库中的签名者,请参阅[钱包集成](/cn/getting-started/typescript#钱包集成)。
然后,检查解析出的账户身份和钱包类型。
`client.account` 包含当前会话的签名者、账户钱包和钱包类型。
```ts AccountIdentity Type theme={null}
type AccountIdentity = {
signer: EvmAddress;
wallet: EvmAddress;
walletType: WalletType;
};
enum WalletType {
EOA = 0,
POLY_PROXY = 1,
GNOSIS_SAFE = 2,
DEPOSIT_WALLET = 3,
}
```
```json AccountIdentity Example theme={null}
{
"signer": "0x8f3cf7ad23cd3cadbd9735aff958023239c6a063",
"wallet": "0x2e234dae75c793f67a35089c9d99245e1c58470b",
"walletType": 3
}
```
至此,你已成功创建新账户。
准备好 Builder API 密钥后,使用 `AsyncSecureClient.create` 创建新账户(同步工作流可使用 `SecureClient.create`)。
首先,使用私钥和 Builder API 密钥创建 `AsyncSecureClient` 或 `SecureClient`。SDK 会派生签名者的存款钱包地址并自动部署该钱包。
```python Async theme={null}
import os
from polymarket import AsyncSecureClient, BuilderApiKey
client = await AsyncSecureClient.create(
private_key=os.environ["SIGNER_PRIVATE_KEY"],
api_key=BuilderApiKey(
key=os.environ["POLYMARKET_BUILDER_API_KEY"],
secret=os.environ["POLYMARKET_BUILDER_SECRET"],
passphrase=os.environ["POLYMARKET_BUILDER_PASSPHRASE"],
),
)
```
```python Sync theme={null}
import os
from polymarket import BuilderApiKey, SecureClient
client = SecureClient.create(
private_key=os.environ["SIGNER_PRIVATE_KEY"],
api_key=BuilderApiKey(
key=os.environ["POLYMARKET_BUILDER_API_KEY"],
secret=os.environ["POLYMARKET_BUILDER_SECRET"],
passphrase=os.environ["POLYMARKET_BUILDER_PASSPHRASE"],
),
)
```
然后,检查解析出的账户钱包和钱包类型。
`client.wallet` 和 `client.wallet_type` 包含当前会话中解析出的账户钱包和钱包类型。
```python Async theme={null}
EvmAddress = NewType("EvmAddress", str)
WalletType: TypeAlias = Literal["EOA", "POLY_PROXY", "GNOSIS_SAFE", "DEPOSIT_WALLET"]
class AsyncSecureClient:
wallet: EvmAddress
wallet_type: WalletType
```
```python Sync theme={null}
EvmAddress = NewType("EvmAddress", str)
WalletType: TypeAlias = Literal["EOA", "POLY_PROXY", "GNOSIS_SAFE", "DEPOSIT_WALLET"]
class SecureClient:
wallet: EvmAddress
wallet_type: WalletType
```
至此,你已成功创建新账户。
准备好 Builder API 密钥后,通过 Relayer 为每个新签名者部署存款钱包。
首先,为每个新签名者准备一个 `WALLET-CREATE` 请求。
```json wallet_create_body theme={null}
{
"type": "WALLET-CREATE",
"from": "",
"to": "0x00000000000Fb5C9ADea0298D729A0CB3823Cc07",
"metadata": "Deploy Deposit Wallet"
}
```
创建以秒为单位的 Unix 时间戳,然后使用 Builder API 密钥的 `secret` 对精确序列化的请求正文签名。
```text theme={null}
request_timestamp =
method = "POST"
request_path = "/submit"
message = request_timestamp + method + request_path + wallet_create_body
builder_signature = urlsafeBase64WithPadding(
HMAC-SHA256(base64Decode(), message)
)
```
然后,将已签名的请求提交到 Relayer。
```bash theme={null}
curl -X POST "https://relayer-v2.polymarket.com/submit" \
-H "Content-Type: application/json" \
-H "POLY_BUILDER_API_KEY: " \
-H "POLY_BUILDER_TIMESTAMP: " \
-H "POLY_BUILDER_PASSPHRASE: " \
-H "POLY_BUILDER_SIGNATURE: " \
-d '{
"type": "WALLET-CREATE",
"from": "",
"to": "0x00000000000Fb5C9ADea0298D729A0CB3823Cc07",
"metadata": "Deploy Deposit Wallet"
}'
```
响应中包含 Relayer 交易 ID。
```json Response theme={null}
{
"transactionID": "",
"state": "STATE_NEW"
}
```
然后,轮询 Relayer 交易,直到其达到 `STATE_CONFIRMED`。
```bash theme={null}
curl "https://relayer-v2.polymarket.com/transaction?id="
```
已确认的交易会在 `proxyAddress` 中包含新的存款钱包地址。
```json Response theme={null}
[
{
"transactionID": "",
"transactionHash": "",
"proxyAddress": "",
"state": "STATE_CONFIRMED"
}
]
```
将 `STATE_FAILED` 和 `STATE_INVALID` 视为最终失败状态。
然后,创建 L1 签名以证明签名者地址的所有权。完整签名流程请参阅 [API 身份验证](/cn/getting-started/api#身份验证)。
```json clobAuthTypedData theme={null}
{
"domain": {
"name": "ClobAuthDomain",
"version": "1",
"chainId": 137
},
"types": {
"ClobAuth": [
{ "name": "address", "type": "address" },
{ "name": "timestamp", "type": "string" },
{ "name": "nonce", "type": "uint256" },
{ "name": "message", "type": "string" }
]
},
"primaryType": "ClobAuth",
"message": {
"address": "",
"timestamp": "",
"nonce": "",
"message": "This message attests that I control the given wallet"
}
}
```
使用控制 `` 的签名者对 `clobAuthTypedData` 进行签名。返回的签名为 ``。
最后,将签名者地址、时间戳、nonce 和 L1 签名发送到 CLOB,以创建 L2 凭据。
```bash Create theme={null}
curl -X POST "https://clob.polymarket.com/auth/api-key" \
-H "POLY_ADDRESS: " \
-H "POLY_SIGNATURE: " \
-H "POLY_TIMESTAMP: " \
-H "POLY_NONCE: "
```
```bash Derive theme={null}
curl "https://clob.polymarket.com/auth/derive-api-key" \
-H "POLY_ADDRESS: " \
-H "POLY_SIGNATURE: " \
-H "POLY_TIMESTAMP: " \
-H "POLY_NONCE: "
```
保存返回的 L2 凭据,用于经过身份验证的请求和下单。
```json Response theme={null}
{
"apiKey": "",
"secret": "",
"passphrase": ""
}
```
至此,你已成功创建新账户。
## 执行免 Gas 交易
无需支付 Gas,即可从账户钱包授权代币支出、转移资金和管理仓位。
`SecureClient` 为受支持的钱包操作提供了具名方法。每个方法都会返回 `TransactionHandle`;调用 `.wait()` 等待操作完成。
使用 Relayer 或 Builder API 密钥创建 `SecureClient`:
```ts Relayer API Key theme={null}
import { createSecureClient, relayerApiKey } from "@polymarket/client";
const client = await createSecureClient({
signer,
wallet: process.env.POLYMARKET_WALLET_ADDRESS,
apiKey: relayerApiKey({
key: process.env.POLYMARKET_RELAYER_API_KEY!,
address: process.env.POLYMARKET_RELAYER_API_KEY_ADDRESS!,
}),
});
```
```ts Builder API Key theme={null}
import { createSecureClient } from "@polymarket/client";
import { builderApiKey } from "@polymarket/client/node";
const client = await createSecureClient({
signer,
wallet: process.env.POLYMARKET_WALLET_ADDRESS,
apiKey: builderApiKey({
key: process.env.POLYMARKET_BUILDER_API_KEY!,
secret: process.env.POLYMARKET_BUILDER_SECRET!,
passphrase: process.env.POLYMARKET_BUILDER_PASSPHRASE!,
}),
});
```
使用与你要执行的钱包操作相对应的方法:
| 操作 | 方法 | 文档 |
| --------------- | ------------------------- | ------------------------------------ |
| 授权 ERC-20 支出 | `approveErc20()` | 见下文 |
| 授权 ERC-1155 操作员 | `approveErc1155ForAll()` | 见下文 |
| 转移 ERC-20 代币 | `transferErc20()` | 见下文 |
| 设置交易授权 | `setupTradingApprovals()` | [设置交易授权](#设置交易授权) |
| 拆分、合并或赎回代币 | 仓位生命周期方法 | [管理仓位](/cn/trading/positions/manage) |
| 为 Perps 账户注资 | `depositToPerps()` | [为账户注资](/perps/fund-your-account) |
**授权 ERC-20 支出**
设置合约从账户钱包支出 ERC-20 代币的额度。传入 `"max"` 以授权最大金额。
```ts theme={null}
const approval = await client.approveErc20({
tokenAddress: "",
spenderAddress: "",
amount: "max",
});
await approval.wait();
```
**授权 ERC-1155 操作员**
允许操作员管理账户钱包持有的所有 ERC-1155 代币。将 `approved` 设置为 `false` 可撤销访问权限。
```ts theme={null}
const approval = await client.approveErc1155ForAll({
tokenAddress: "",
operatorAddress: "",
approved: true,
});
await approval.wait();
```
**转移 ERC-20 代币**
从账户钱包转移 ERC-20 代币。`amount` 以代币的基本单位表示。
```ts theme={null}
const transfer = await client.transferErc20({
tokenAddress: "",
recipientAddress: "",
amount: 1_000_000n,
});
await transfer.wait();
```
`AsyncSecureClient` 为受支持的钱包操作提供了具名方法。每个方法都会返回交易句柄;调用 `await handle.wait()` 等待操作完成。同步版 `SecureClient` 也提供相同的方法。
使用 Relayer 或 Builder API 密钥创建 `AsyncSecureClient`:
```python Relayer API Key theme={null}
import os
from polymarket import AsyncSecureClient, RelayerApiKey
client = await AsyncSecureClient.create(
private_key=os.environ["SIGNER_PRIVATE_KEY"],
wallet=os.environ["POLYMARKET_WALLET_ADDRESS"],
api_key=RelayerApiKey(
key=os.environ["POLYMARKET_RELAYER_API_KEY"],
address=os.environ["POLYMARKET_RELAYER_API_KEY_ADDRESS"],
),
)
```
```python Builder API Key theme={null}
import os
from polymarket import AsyncSecureClient, BuilderApiKey
client = await AsyncSecureClient.create(
private_key=os.environ["SIGNER_PRIVATE_KEY"],
wallet=os.environ["POLYMARKET_WALLET_ADDRESS"],
api_key=BuilderApiKey(
key=os.environ["POLYMARKET_BUILDER_API_KEY"],
secret=os.environ["POLYMARKET_BUILDER_SECRET"],
passphrase=os.environ["POLYMARKET_BUILDER_PASSPHRASE"],
),
)
```
使用与你要执行的钱包操作相对应的方法:
| 操作 | 方法 | 文档 |
| --------------- | --------------------------- | ------------------------------------ |
| 授权 ERC-20 支出 | `approve_erc20()` | 见下文 |
| 授权 ERC-1155 操作员 | `approve_erc1155_for_all()` | 见下文 |
| 转移 ERC-20 代币 | `transfer_erc20()` | 见下文 |
| 设置交易授权 | `setup_trading_approvals()` | [设置交易授权](#设置交易授权) |
| 拆分、合并或赎回代币 | 仓位生命周期方法 | [管理仓位](/cn/trading/positions/manage) |
| 为 Perps 账户注资 | `deposit_to_perps()` | [为账户注资](/perps/fund-your-account) |
**授权 ERC-20 支出**
设置合约从账户钱包支出 ERC-20 代币的额度。传入 `"max"` 以授权最大金额。
```python theme={null}
approval = await client.approve_erc20(
token_address="",
spender_address="",
amount="max",
)
await approval.wait()
```
**授权 ERC-1155 操作员**
允许操作员管理账户钱包持有的所有 ERC-1155 代币。将 `approved` 设置为 `False` 可撤销访问权限。
```python theme={null}
approval = await client.approve_erc1155_for_all(
token_address="",
operator_address="",
approved=True,
)
await approval.wait()
```
**转移 ERC-20 代币**
从账户钱包转移 ERC-20 代币。`amount` 以代币的基本单位表示。
```python theme={null}
transfer = await client.transfer_erc20(
token_address="",
recipient_address="",
amount=1_000_000,
)
await transfer.wait()
```
存款钱包以有序批次执行一个或多个合约调用。签名者授权完整批次,Relayer 则以免 Gas 方式提交该批次。
以下步骤展示存款钱包流程。对于 Safe 或 Proxy Wallet
流程,请使用能处理相应钱包特定载荷的 SDK。
首先,对每个合约调用进行编码,并按执行顺序将其添加到批次中。
```json theme={null}
[
{
"target": "",
"value": "0",
"data": ""
}
]
```
`target` 是要调用的合约,`value` 是以 wei 表示的原生 POL 发送数量,`data` 是经过 ABI 编码的函数调用。当调用不转移 POL 时,将 `value` 设为 `"0"`。
然后,使用集成的 API 密钥为签名者获取新的 `WALLET` nonce。
```bash Relayer API Key theme={null}
curl -G "https://relayer-v2.polymarket.com/v1/account/transactions/params" \
-H "RELAYER_API_KEY: " \
-H "RELAYER_API_KEY_ADDRESS: " \
--data-urlencode "address=" \
--data-urlencode "type=WALLET"
```
```bash Builder API Key theme={null}
curl -G "https://relayer-v2.polymarket.com/v1/account/transactions/params" \
-H "POLY_BUILDER_API_KEY: " \
-H "POLY_BUILDER_TIMESTAMP: " \
-H "POLY_BUILDER_PASSPHRASE: " \
-H "POLY_BUILDER_SIGNATURE: " \
--data-urlencode "address=" \
--data-urlencode "type=WALLET"
```
对于 Builder API 密钥,根据请求时间戳、方法和路径创建 `builder_signature`。完整签名流程请参阅[创建新账户](#创建新账户)。
```json Response theme={null}
{
"address": "",
"nonce": ""
}
```
构建包含钱包地址、新 nonce、未来截止时间和调用列表的存款钱包 `Batch`。
```json walletBatchTypedData theme={null}
{
"domain": {
"name": "DepositWallet",
"version": "1",
"chainId": 137,
"verifyingContract": ""
},
"types": {
"Call": [
{ "name": "target", "type": "address" },
{ "name": "value", "type": "uint256" },
{ "name": "data", "type": "bytes" }
],
"Batch": [
{ "name": "wallet", "type": "address" },
{ "name": "nonce", "type": "uint256" },
{ "name": "deadline", "type": "uint256" },
{ "name": "calls", "type": "Call[]" }
]
},
"primaryType": "Batch",
"message": {
"wallet": "",
"nonce": "",
"deadline": "",
"calls": [
{
"target": "",
"value": "0",
"data": ""
}
]
}
}
```
使用控制存款钱包的签名者对类型化数据进行签名。以下示例使用 Viem。
```ts theme={null}
import { privateKeyToAccount } from "viem/accounts";
const signer = privateKeyToAccount(
process.env.SIGNER_PRIVATE_KEY as `0x${string}`,
);
const walletBatchSignature = await signer.signTypedData(walletBatchTypedData);
```
使用相同的调用列表和集成 API 密钥提交已签名的批次。
```bash Relayer API Key theme={null}
curl -X POST "https://relayer-v2.polymarket.com/submit" \
-H "Content-Type: application/json" \
-H "RELAYER_API_KEY: " \
-H "RELAYER_API_KEY_ADDRESS: " \
-d '{
"type": "WALLET",
"from": "",
"to": "0x00000000000Fb5C9ADea0298D729A0CB3823Cc07",
"nonce": "",
"signature": "",
"metadata": "",
"depositWalletParams": {
"depositWallet": "",
"deadline": "",
"calls": [
{
"target": "",
"value": "0",
"data": ""
}
]
}
}'
```
```bash Builder API Key theme={null}
curl -X POST "https://relayer-v2.polymarket.com/submit" \
-H "Content-Type: application/json" \
-H "POLY_BUILDER_API_KEY: " \
-H "POLY_BUILDER_TIMESTAMP: " \
-H "POLY_BUILDER_PASSPHRASE: " \
-H "POLY_BUILDER_SIGNATURE: " \
-d '{
"type": "WALLET",
"from": "",
"to": "0x00000000000Fb5C9ADea0298D729A0CB3823Cc07",
"nonce": "",
"signature": "",
"metadata": "",
"depositWalletParams": {
"depositWallet": "",
"deadline": "",
"calls": [
{
"target": "",
"value": "0",
"data": ""
}
]
}
}'
```
对于 Builder API 密钥,请按照[创建新账户](#创建新账户)中的说明,对请求时间戳、方法、路径和精确序列化的正文进行签名。
响应中包含下一步要使用的交易 ID。
```json Response theme={null}
{
"transactionID": "",
"state": "STATE_NEW"
}
```
轮询交易,直到其达到 `STATE_CONFIRMED`。
```bash Relayer API Key theme={null}
curl "https://relayer-v2.polymarket.com/v1/account/transactions/" \
-H "RELAYER_API_KEY: " \
-H "RELAYER_API_KEY_ADDRESS: "
```
```bash Builder API Key theme={null}
curl "https://relayer-v2.polymarket.com/v1/account/transactions/" \
-H "POLY_BUILDER_API_KEY: " \
-H "POLY_BUILDER_TIMESTAMP: " \
-H "POLY_BUILDER_PASSPHRASE: " \
-H "POLY_BUILDER_SIGNATURE: "
```
```json Response theme={null}
{
"transaction_id": "",
"transaction_hash": "",
"state": "STATE_CONFIRMED",
"error_msg": null
}
```
将 `STATE_FAILED` 和 `STATE_INVALID` 视为最终失败状态。
## 设置交易授权
设置 ERC-20 和 ERC-1155 授权,使 Polymarket 的交易所合约能够在下单时支出账户钱包中的 pUSD 和条件代币。对于存款钱包、Safe Wallet 和 Proxy Wallet,这些授权会以免 Gas 交易的形式提交。
使用 Relayer 或 Builder API 密钥创建 `SecureClient`:
```ts Relayer API Key theme={null}
import { createSecureClient, relayerApiKey } from "@polymarket/client";
const client = await createSecureClient({
signer,
wallet: process.env.POLYMARKET_WALLET_ADDRESS,
apiKey: relayerApiKey({
key: process.env.POLYMARKET_RELAYER_API_KEY!,
address: process.env.POLYMARKET_RELAYER_API_KEY_ADDRESS!,
}),
});
```
```ts Builder API Key theme={null}
import { createSecureClient } from "@polymarket/client";
import { builderApiKey } from "@polymarket/client/node";
const client = await createSecureClient({
signer,
wallet: process.env.POLYMARKET_WALLET_ADDRESS,
apiKey: builderApiKey({
key: process.env.POLYMARKET_BUILDER_API_KEY!,
secret: process.env.POLYMARKET_BUILDER_SECRET!,
passphrase: process.env.POLYMARKET_BUILDER_PASSPHRASE!,
}),
});
```
调用 `setupTradingApprovals()` 配置所需额度:
```ts theme={null}
await client.setupTradingApprovals();
```
该方法会检查现有授权,并只提交缺少的授权,因此可以安全地多次调用。
下单时可以自动补全缺少的额度。提前设置可避免在首次下单时执行这项工作。
使用 Relayer 或 Builder API 密钥创建 `AsyncSecureClient`(同步版 `SecureClient` 也支持相同的工作流):
```python Relayer API Key theme={null}
import os
from polymarket import AsyncSecureClient, RelayerApiKey
client = await AsyncSecureClient.create(
private_key=os.environ["SIGNER_PRIVATE_KEY"],
wallet=os.environ["POLYMARKET_WALLET_ADDRESS"],
api_key=RelayerApiKey(
key=os.environ["POLYMARKET_RELAYER_API_KEY"],
address=os.environ["POLYMARKET_RELAYER_API_KEY_ADDRESS"],
),
)
```
```python Builder API Key theme={null}
import os
from polymarket import AsyncSecureClient, BuilderApiKey
client = await AsyncSecureClient.create(
private_key=os.environ["SIGNER_PRIVATE_KEY"],
wallet=os.environ["POLYMARKET_WALLET_ADDRESS"],
api_key=BuilderApiKey(
key=os.environ["POLYMARKET_BUILDER_API_KEY"],
secret=os.environ["POLYMARKET_BUILDER_SECRET"],
passphrase=os.environ["POLYMARKET_BUILDER_PASSPHRASE"],
),
)
```
调用 `setup_trading_approvals()` 配置所需额度:
```python theme={null}
await client.setup_trading_approvals()
```
该方法会检查现有授权,并只提交缺少的授权,因此可以安全地多次调用。
下单时可以自动补全缺少的额度。提前设置可避免在首次下单时执行这项工作。
配置两个 CLOB 交易所合约,使存款钱包能够在标准市场和负风险市场中买卖。
以下步骤展示存款钱包流程。对于 Safe 或 Proxy Wallet
流程,请使用能处理相应钱包特定载荷的 SDK。有关 EOA 交易,请参阅[设置 EOA
交易](#set-up-eoa-trading)。
首先,在构建交易之前检查每项额度,确保批次中只包含缺少的授权。
| 代币 | 要授权的合约 | 合约调用 |
| ---- | ------ | ------------------------------------------- |
| pUSD | 标准交易所 | `approve(StandardExchange, maxUint256)` |
| pUSD | 负风险交易所 | `approve(NegRiskExchange, maxUint256)` |
| 条件代币 | 标准交易所 | `setApprovalForAll(StandardExchange, true)` |
| 条件代币 | 负风险交易所 | `setApprovalForAll(NegRiskExchange, true)` |
通过 pUSD 上的 `allowance(wallet, exchange)` 和条件代币上的 `isApprovedForAll(wallet, exchange)` 读取当前值。
| 合约 | 地址 |
| ------ | -------------------------------------------- |
| pUSD | `0xC011a7E12a19f7B1f670d46F03B03f3342E82DFB` |
| 条件代币 | `0x4D97DCd97eC945f40cF65F87097ACe5EA0476045` |
| 标准交易所 | `0xE111180000d2663C0091e4f400237545B87B996B` |
| 负风险交易所 | `0xe2222d279d744050d28e00520010520000310F59` |
然后,对缺少的 ERC-20 和 ERC-1155 授权调用进行编码。
```solidity ERC-20 Approval theme={null}
function approve(address spender, uint256 amount) returns (bool);
```
```solidity ERC-1155 Approval theme={null}
function setApprovalForAll(address operator, bool approved);
```
为每项缺少的授权构建一个调用。此示例包含全部四项。
```json theme={null}
[
{
"target": "0xC011a7E12a19f7B1f670d46F03B03f3342E82DFB",
"value": "0",
"data": ""
},
{
"target": "0xC011a7E12a19f7B1f670d46F03B03f3342E82DFB",
"value": "0",
"data": ""
},
{
"target": "0x4D97DCd97eC945f40cF65F87097ACe5EA0476045",
"value": "0",
"data": ""
},
{
"target": "0x4D97DCd97eC945f40cF65F87097ACe5EA0476045",
"value": "0",
"data": ""
}
]
```
将授权调用列表用作[执行免 Gas 交易](#执行免-gas-交易)中的 `calls`。获取新的 nonce,对完整批次签名并提交,然后等待 `STATE_CONFIRMED` 后再继续。
最后,更新 CLOB 额度缓存:
```bash Collateral theme={null}
curl -G "https://clob.polymarket.com/balance-allowance/update" \
-H "POLY_ADDRESS: " \
-H "POLY_SIGNATURE: " \
-H "POLY_TIMESTAMP: " \
-H "POLY_API_KEY: " \
-H "POLY_PASSPHRASE: " \
--data-urlencode "asset_type=COLLATERAL" \
--data-urlencode "signature_type=3"
```
```bash Conditional Token theme={null}
curl -G "https://clob.polymarket.com/balance-allowance/update" \
-H "POLY_ADDRESS: " \
-H "POLY_SIGNATURE: " \
-H "POLY_TIMESTAMP: " \
-H "POLY_API_KEY: " \
-H "POLY_PASSPHRASE: " \
--data-urlencode "asset_type=CONDITIONAL" \
--data-urlencode "token_id=" \
--data-urlencode "signature_type=3"
```
使用 [API 身份验证](/cn/getting-started/api#身份验证)中的签名者地址和 CLOB API 凭据,创建新的 ``,并在没有请求正文的情况下生成 ``。查询参数不属于签名路径的一部分:
```text theme={null}
message = + "GET" + "/balance-allowance/update"
clob_l2_signature = urlsafeBase64WithPadding(
HMAC-SHA256(base64Decode(), message)
)
```
在每种代币首次提交卖单之前,刷新其条件代币额度。
***
## 高级选项
探索适用于高级集成的其他钱包和身份验证模式。
### 派生存款钱包地址
如果需要在部署前计算存款钱包地址,请使用以下确定性派生算法。
2026 年 6 月 29 日升级之前部署的存款钱包使用 UUPS
代理。升级后部署的存款钱包使用信标代理。以下算法派生使用信标代理的新存款钱包地址。
```text theme={null}
factory = 0x00000000000Fb5C9ADea0298D729A0CB3823Cc07
beacon = 0x7A18EDfe055488A3128f01F563e5B479D92ffc3a
walletId = bytes32(signer) // left-pad the signer to 32 bytes
args = abi.encode(factory, walletId)
salt = keccak256(args)
beaconInitCodeHash = SoladyLibClone.initCodeHashERC1967BeaconProxy(beacon, args)
depositWallet = CREATE2(factory, salt, beaconInitCodeHash)
```
当前存款钱包工厂和信标请参阅[合约地址](/cn/resources/contracts#钱包工厂合约)。
### 设置 EOA 交易
如果你的 EOA 已列入交易白名单,可将其用作账户钱包。所有链上操作(包括代币授权、ERC-20 转账、拆分、合并和赎回)都直接从 EOA 提交,并需要使用 POL 支付 Gas。
将签名者地址作为 `wallet` 传入。SDK 会将账户识别为 EOA,并跳过存款钱包部署。
```ts theme={null}
import { createSecureClient } from "@polymarket/client";
import { privateKey } from "@polymarket/client/viem";
const signer = privateKey(process.env.SIGNER_PRIVATE_KEY);
const client = await createSecureClient({
signer,
wallet: await signer.getAddress(),
});
```
`approveErc20()`、`approveErc1155ForAll()`、`transferErc20()` 和仓位生命周期方法等会直接从签名者提交交易。例如,设置所有必需的交易授权:
```ts theme={null}
await client.setupTradingApprovals();
```
将签名者地址作为 `wallet` 传入。SDK 会将账户识别为 EOA,并跳过存款钱包部署。
```python theme={null}
import os
from polymarket import AsyncSecureClient
client = await AsyncSecureClient.create(
private_key=os.environ["SIGNER_PRIVATE_KEY"],
wallet=os.environ["POLYMARKET_SIGNER_ADDRESS"],
)
```
`approve_erc20()`、`approve_erc1155_for_all()`、`transfer_erc20()` 和仓位生命周期方法等会直接从签名者提交交易。例如,设置所有必需的交易授权:
```python theme={null}
await client.setup_trading_approvals()
```
首先,授权两个 CLOB 交易所合约支出 pUSD 并管理条件代币。从 EOA 提交每项必需的授权交易,并使用该地址持有的 POL 支付 Gas。
所需授权和合约地址请参阅[设置交易授权](#设置交易授权)。
然后,创建 L1 签名以证明 EOA 的所有权。完整签名流程请参阅 [API 身份验证](/cn/getting-started/api#身份验证)。
```json clobAuthTypedData theme={null}
{
"domain": {
"name": "ClobAuthDomain",
"version": "1",
"chainId": 137
},
"types": {
"ClobAuth": [
{ "name": "address", "type": "address" },
{ "name": "timestamp", "type": "string" },
{ "name": "nonce", "type": "uint256" },
{ "name": "message", "type": "string" }
]
},
"primaryType": "ClobAuth",
"message": {
"address": "",
"timestamp": "",
"nonce": "",
"message": "This message attests that I control the given wallet"
}
}
```
使用 EOA 对 `clobAuthTypedData` 进行签名。返回的签名为 ``。
最后,将签名者地址、时间戳、nonce 和 L1 签名发送到 CLOB,以创建 L2 凭据。
```bash Create theme={null}
curl -X POST "https://clob.polymarket.com/auth/api-key" \
-H "POLY_ADDRESS: " \
-H "POLY_SIGNATURE: " \
-H "POLY_TIMESTAMP: " \
-H "POLY_NONCE: "
```
```bash Derive theme={null}
curl "https://clob.polymarket.com/auth/derive-api-key" \
-H "POLY_ADDRESS: " \
-H "POLY_SIGNATURE: " \
-H "POLY_TIMESTAMP: " \
-H "POLY_NONCE: "
```
保存返回的 L2 凭据,用于经过身份验证的请求和下单。
```json Response theme={null}
{
"apiKey": "",
"secret": "",
"passphrase": ""
}
```
完整的直接 API 下单流程请参阅[提交限价单](/cn/trading/place-orders#下限价单)。
### 远程 Builder 签名
远程 Builder 签名将 Builder API 凭据保存在你的服务器上,同时允许 TypeScript 客户端为需要 Builder 身份验证的操作请求已签名的请求头。
在服务器上验证调用方身份并进行授权,然后对客户端提供的请求详情进行签名。
```ts theme={null}
import { buildHmacSignature } from "@polymarket/client";
export async function POST(request: Request): Promise {
const { body, method, path } = await request.json();
const timestamp = Math.floor(Date.now() / 1000);
return Response.json({
POLY_BUILDER_API_KEY: process.env.POLYMARKET_BUILDER_API_KEY!,
POLY_BUILDER_PASSPHRASE: process.env.POLYMARKET_BUILDER_PASSPHRASE!,
POLY_BUILDER_SIGNATURE: await buildHmacSignature(
process.env.POLYMARKET_BUILDER_SECRET!,
timestamp,
method,
path,
body,
),
POLY_BUILDER_TIMESTAMP: `${timestamp}`,
});
}
```
将用户的签名者和签名端点传给客户端。使用应用程序的会话凭据或自定义请求头验证签名请求。
```ts Cookie Session theme={null}
import { createSecureClient, remoteBuilderSigning } from "@polymarket/client";
const client = await createSecureClient({
signer,
apiKey: remoteBuilderSigning({
url: "/api/builder/sign",
credentials: "include",
}),
});
```
```ts Custom Headers theme={null}
import { createSecureClient, remoteBuilderSigning } from "@polymarket/client";
const client = await createSecureClient({
signer,
apiKey: remoteBuilderSigning({
url: "/api/builder/sign",
headers: {
Authorization: "Bearer eyJhbGciOiJIUzI1NiJ9.…",
},
}),
});
```
Builder API 凭据保留在服务器上;客户端只会收到当前授权请求的请求头。
### 退出信标升级
2026 年 6 月 29 日之后部署的存款钱包使用 [ERC-1967 信标代理](https://eips.ethereum.org/EIPS/eip-1967#beacon-contract-address)。此代理模式通过共享信标为多个钱包解析实现,使 Polymarket 可以在不更改钱包地址的情况下推送实现升级。钱包所有者也可以选择退出,将钱包固定到退出时的当前实现。以下仅限所有者执行的调用会直接提交,并需要使用 POL 支付 Gas。
退出的钱包不会收到未来通过信标升级提供的安全修复、错误修复或新功能。退出前,请审查当前实现并承担维护钱包的责任。
由钱包所有者发送直接链上交易,调用存款钱包的 `pause()`。
从存款钱包工厂读取 `timelockDelay()`,并在钱包暂停后等待该时间间隔结束。
由钱包所有者发送另一笔交易,调用存款钱包的
`optOut()`。这会将钱包固定到交易执行时的当前信标实现。
由钱包所有者调用 `unpause()`,清除暂停状态。
要恢复接收信标升级,请重复暂停和时间锁步骤,调用 `optIn()`,然后取消暂停钱包。重新加入前,请审查信标当前的默认实现。
复制创建后显示的 **API Key**、**Secret** 和 **Passphrase**。
Builder API 凭据属于敏感信息。请将其保存在服务器上,切勿公开或分享。
准备好 Builder API 密钥后,使用 `createSecureClient` 创建新账户。
首先,使用签名者和 Builder API 密钥创建 `SecureClient`。SDK 会派生签名者的存款钱包地址并自动部署该钱包。
```ts theme={null}
import { createSecureClient } from "@polymarket/client";
import { builderApiKey } from "@polymarket/client/node";
import { privateKey } from "@polymarket/client/viem";
const client = await createSecureClient({
signer: privateKey(process.env.SIGNER_PRIVATE_KEY),
apiKey: builderApiKey({
key: process.env.POLYMARKET_BUILDER_API_KEY!,
secret: process.env.POLYMARKET_BUILDER_SECRET!,
passphrase: process.env.POLYMARKET_BUILDER_PASSPHRASE!,
}),
});
```
此示例使用 Viem
和私钥。要连接其他受支持钱包库中的签名者,请参阅[钱包集成](/cn/getting-started/typescript#钱包集成)。
然后,检查解析出的账户身份和钱包类型。
`client.account` 包含当前会话的签名者、账户钱包和钱包类型。
```ts AccountIdentity Type theme={null}
type AccountIdentity = {
signer: EvmAddress;
wallet: EvmAddress;
walletType: WalletType;
};
enum WalletType {
EOA = 0,
POLY_PROXY = 1,
GNOSIS_SAFE = 2,
DEPOSIT_WALLET = 3,
}
```
```json AccountIdentity Example theme={null}
{
"signer": "0x8f3cf7ad23cd3cadbd9735aff958023239c6a063",
"wallet": "0x2e234dae75c793f67a35089c9d99245e1c58470b",
"walletType": 3
}
```
至此,你已成功创建新账户。
准备好 Builder API 密钥后,使用 `AsyncSecureClient.create` 创建新账户(同步工作流可使用 `SecureClient.create`)。
首先,使用私钥和 Builder API 密钥创建 `AsyncSecureClient` 或 `SecureClient`。SDK 会派生签名者的存款钱包地址并自动部署该钱包。
```python Async theme={null}
import os
from polymarket import AsyncSecureClient, BuilderApiKey
client = await AsyncSecureClient.create(
private_key=os.environ["SIGNER_PRIVATE_KEY"],
api_key=BuilderApiKey(
key=os.environ["POLYMARKET_BUILDER_API_KEY"],
secret=os.environ["POLYMARKET_BUILDER_SECRET"],
passphrase=os.environ["POLYMARKET_BUILDER_PASSPHRASE"],
),
)
```
```python Sync theme={null}
import os
from polymarket import BuilderApiKey, SecureClient
client = SecureClient.create(
private_key=os.environ["SIGNER_PRIVATE_KEY"],
api_key=BuilderApiKey(
key=os.environ["POLYMARKET_BUILDER_API_KEY"],
secret=os.environ["POLYMARKET_BUILDER_SECRET"],
passphrase=os.environ["POLYMARKET_BUILDER_PASSPHRASE"],
),
)
```
然后,检查解析出的账户钱包和钱包类型。
`client.wallet` 和 `client.wallet_type` 包含当前会话中解析出的账户钱包和钱包类型。
```python Async theme={null}
EvmAddress = NewType("EvmAddress", str)
WalletType: TypeAlias = Literal["EOA", "POLY_PROXY", "GNOSIS_SAFE", "DEPOSIT_WALLET"]
class AsyncSecureClient:
wallet: EvmAddress
wallet_type: WalletType
```
```python Sync theme={null}
EvmAddress = NewType("EvmAddress", str)
WalletType: TypeAlias = Literal["EOA", "POLY_PROXY", "GNOSIS_SAFE", "DEPOSIT_WALLET"]
class SecureClient:
wallet: EvmAddress
wallet_type: WalletType
```
至此,你已成功创建新账户。
准备好 Builder API 密钥后,通过 Relayer 为每个新签名者部署存款钱包。
首先,为每个新签名者准备一个 `WALLET-CREATE` 请求。
```json wallet_create_body theme={null}
{
"type": "WALLET-CREATE",
"from": "",
"to": "0x00000000000Fb5C9ADea0298D729A0CB3823Cc07",
"metadata": "Deploy Deposit Wallet"
}
```
创建以秒为单位的 Unix 时间戳,然后使用 Builder API 密钥的 `secret` 对精确序列化的请求正文签名。
```text theme={null}
request_timestamp =
method = "POST"
request_path = "/submit"
message = request_timestamp + method + request_path + wallet_create_body
builder_signature = urlsafeBase64WithPadding(
HMAC-SHA256(base64Decode(), message)
)
```
然后,将已签名的请求提交到 Relayer。
```bash theme={null}
curl -X POST "https://relayer-v2.polymarket.com/submit" \
-H "Content-Type: application/json" \
-H "POLY_BUILDER_API_KEY: " \
-H "POLY_BUILDER_TIMESTAMP: " \
-H "POLY_BUILDER_PASSPHRASE: " \
-H "POLY_BUILDER_SIGNATURE: " \
-d '{
"type": "WALLET-CREATE",
"from": "",
"to": "0x00000000000Fb5C9ADea0298D729A0CB3823Cc07",
"metadata": "Deploy Deposit Wallet"
}'
```
响应中包含 Relayer 交易 ID。
```json Response theme={null}
{
"transactionID": "",
"state": "STATE_NEW"
}
```
然后,轮询 Relayer 交易,直到其达到 `STATE_CONFIRMED`。
```bash theme={null}
curl "https://relayer-v2.polymarket.com/transaction?id="
```
已确认的交易会在 `proxyAddress` 中包含新的存款钱包地址。
```json Response theme={null}
[
{
"transactionID": "",
"transactionHash": "",
"proxyAddress": "",
"state": "STATE_CONFIRMED"
}
]
```
将 `STATE_FAILED` 和 `STATE_INVALID` 视为最终失败状态。
然后,创建 L1 签名以证明签名者地址的所有权。完整签名流程请参阅 [API 身份验证](/cn/getting-started/api#身份验证)。
```json clobAuthTypedData theme={null}
{
"domain": {
"name": "ClobAuthDomain",
"version": "1",
"chainId": 137
},
"types": {
"ClobAuth": [
{ "name": "address", "type": "address" },
{ "name": "timestamp", "type": "string" },
{ "name": "nonce", "type": "uint256" },
{ "name": "message", "type": "string" }
]
},
"primaryType": "ClobAuth",
"message": {
"address": "",
"timestamp": "",
"nonce": "",
"message": "This message attests that I control the given wallet"
}
}
```
使用控制 `` 的签名者对 `clobAuthTypedData` 进行签名。返回的签名为 ``。
最后,将签名者地址、时间戳、nonce 和 L1 签名发送到 CLOB,以创建 L2 凭据。
```bash Create theme={null}
curl -X POST "https://clob.polymarket.com/auth/api-key" \
-H "POLY_ADDRESS: " \
-H "POLY_SIGNATURE: " \
-H "POLY_TIMESTAMP: " \
-H "POLY_NONCE: "
```
```bash Derive theme={null}
curl "https://clob.polymarket.com/auth/derive-api-key" \
-H "POLY_ADDRESS: " \
-H "POLY_SIGNATURE: " \
-H "POLY_TIMESTAMP: " \
-H "POLY_NONCE: "
```
保存返回的 L2 凭据,用于经过身份验证的请求和下单。
```json Response theme={null}
{
"apiKey": "",
"secret": "",
"passphrase": ""
}
```
至此,你已成功创建新账户。
## 执行免 Gas 交易
无需支付 Gas,即可从账户钱包授权代币支出、转移资金和管理仓位。
`SecureClient` 为受支持的钱包操作提供了具名方法。每个方法都会返回 `TransactionHandle`;调用 `.wait()` 等待操作完成。
使用 Relayer 或 Builder API 密钥创建 `SecureClient`:
```ts Relayer API Key theme={null}
import { createSecureClient, relayerApiKey } from "@polymarket/client";
const client = await createSecureClient({
signer,
wallet: process.env.POLYMARKET_WALLET_ADDRESS,
apiKey: relayerApiKey({
key: process.env.POLYMARKET_RELAYER_API_KEY!,
address: process.env.POLYMARKET_RELAYER_API_KEY_ADDRESS!,
}),
});
```
```ts Builder API Key theme={null}
import { createSecureClient } from "@polymarket/client";
import { builderApiKey } from "@polymarket/client/node";
const client = await createSecureClient({
signer,
wallet: process.env.POLYMARKET_WALLET_ADDRESS,
apiKey: builderApiKey({
key: process.env.POLYMARKET_BUILDER_API_KEY!,
secret: process.env.POLYMARKET_BUILDER_SECRET!,
passphrase: process.env.POLYMARKET_BUILDER_PASSPHRASE!,
}),
});
```
使用与你要执行的钱包操作相对应的方法:
| 操作 | 方法 | 文档 |
| --------------- | ------------------------- | ------------------------------------ |
| 授权 ERC-20 支出 | `approveErc20()` | 见下文 |
| 授权 ERC-1155 操作员 | `approveErc1155ForAll()` | 见下文 |
| 转移 ERC-20 代币 | `transferErc20()` | 见下文 |
| 设置交易授权 | `setupTradingApprovals()` | [设置交易授权](#设置交易授权) |
| 拆分、合并或赎回代币 | 仓位生命周期方法 | [管理仓位](/cn/trading/positions/manage) |
| 为 Perps 账户注资 | `depositToPerps()` | [为账户注资](/perps/fund-your-account) |
**授权 ERC-20 支出**
设置合约从账户钱包支出 ERC-20 代币的额度。传入 `"max"` 以授权最大金额。
```ts theme={null}
const approval = await client.approveErc20({
tokenAddress: "",
spenderAddress: "",
amount: "max",
});
await approval.wait();
```
**授权 ERC-1155 操作员**
允许操作员管理账户钱包持有的所有 ERC-1155 代币。将 `approved` 设置为 `false` 可撤销访问权限。
```ts theme={null}
const approval = await client.approveErc1155ForAll({
tokenAddress: "",
operatorAddress: "",
approved: true,
});
await approval.wait();
```
**转移 ERC-20 代币**
从账户钱包转移 ERC-20 代币。`amount` 以代币的基本单位表示。
```ts theme={null}
const transfer = await client.transferErc20({
tokenAddress: "",
recipientAddress: "",
amount: 1_000_000n,
});
await transfer.wait();
```
`AsyncSecureClient` 为受支持的钱包操作提供了具名方法。每个方法都会返回交易句柄;调用 `await handle.wait()` 等待操作完成。同步版 `SecureClient` 也提供相同的方法。
使用 Relayer 或 Builder API 密钥创建 `AsyncSecureClient`:
```python Relayer API Key theme={null}
import os
from polymarket import AsyncSecureClient, RelayerApiKey
client = await AsyncSecureClient.create(
private_key=os.environ["SIGNER_PRIVATE_KEY"],
wallet=os.environ["POLYMARKET_WALLET_ADDRESS"],
api_key=RelayerApiKey(
key=os.environ["POLYMARKET_RELAYER_API_KEY"],
address=os.environ["POLYMARKET_RELAYER_API_KEY_ADDRESS"],
),
)
```
```python Builder API Key theme={null}
import os
from polymarket import AsyncSecureClient, BuilderApiKey
client = await AsyncSecureClient.create(
private_key=os.environ["SIGNER_PRIVATE_KEY"],
wallet=os.environ["POLYMARKET_WALLET_ADDRESS"],
api_key=BuilderApiKey(
key=os.environ["POLYMARKET_BUILDER_API_KEY"],
secret=os.environ["POLYMARKET_BUILDER_SECRET"],
passphrase=os.environ["POLYMARKET_BUILDER_PASSPHRASE"],
),
)
```
使用与你要执行的钱包操作相对应的方法:
| 操作 | 方法 | 文档 |
| --------------- | --------------------------- | ------------------------------------ |
| 授权 ERC-20 支出 | `approve_erc20()` | 见下文 |
| 授权 ERC-1155 操作员 | `approve_erc1155_for_all()` | 见下文 |
| 转移 ERC-20 代币 | `transfer_erc20()` | 见下文 |
| 设置交易授权 | `setup_trading_approvals()` | [设置交易授权](#设置交易授权) |
| 拆分、合并或赎回代币 | 仓位生命周期方法 | [管理仓位](/cn/trading/positions/manage) |
| 为 Perps 账户注资 | `deposit_to_perps()` | [为账户注资](/perps/fund-your-account) |
**授权 ERC-20 支出**
设置合约从账户钱包支出 ERC-20 代币的额度。传入 `"max"` 以授权最大金额。
```python theme={null}
approval = await client.approve_erc20(
token_address="",
spender_address="",
amount="max",
)
await approval.wait()
```
**授权 ERC-1155 操作员**
允许操作员管理账户钱包持有的所有 ERC-1155 代币。将 `approved` 设置为 `False` 可撤销访问权限。
```python theme={null}
approval = await client.approve_erc1155_for_all(
token_address="",
operator_address="",
approved=True,
)
await approval.wait()
```
**转移 ERC-20 代币**
从账户钱包转移 ERC-20 代币。`amount` 以代币的基本单位表示。
```python theme={null}
transfer = await client.transfer_erc20(
token_address="",
recipient_address="",
amount=1_000_000,
)
await transfer.wait()
```
存款钱包以有序批次执行一个或多个合约调用。签名者授权完整批次,Relayer 则以免 Gas 方式提交该批次。
以下步骤展示存款钱包流程。对于 Safe 或 Proxy Wallet
流程,请使用能处理相应钱包特定载荷的 SDK。
首先,对每个合约调用进行编码,并按执行顺序将其添加到批次中。
```json theme={null}
[
{
"target": "",
"value": "0",
"data": ""
}
]
```
`target` 是要调用的合约,`value` 是以 wei 表示的原生 POL 发送数量,`data` 是经过 ABI 编码的函数调用。当调用不转移 POL 时,将 `value` 设为 `"0"`。
然后,使用集成的 API 密钥为签名者获取新的 `WALLET` nonce。
```bash Relayer API Key theme={null}
curl -G "https://relayer-v2.polymarket.com/v1/account/transactions/params" \
-H "RELAYER_API_KEY: " \
-H "RELAYER_API_KEY_ADDRESS: " \
--data-urlencode "address=" \
--data-urlencode "type=WALLET"
```
```bash Builder API Key theme={null}
curl -G "https://relayer-v2.polymarket.com/v1/account/transactions/params" \
-H "POLY_BUILDER_API_KEY: " \
-H "POLY_BUILDER_TIMESTAMP: " \
-H "POLY_BUILDER_PASSPHRASE: " \
-H "POLY_BUILDER_SIGNATURE: " \
--data-urlencode "address=" \
--data-urlencode "type=WALLET"
```
对于 Builder API 密钥,根据请求时间戳、方法和路径创建 `builder_signature`。完整签名流程请参阅[创建新账户](#创建新账户)。
```json Response theme={null}
{
"address": "",
"nonce": ""
}
```
构建包含钱包地址、新 nonce、未来截止时间和调用列表的存款钱包 `Batch`。
```json walletBatchTypedData theme={null}
{
"domain": {
"name": "DepositWallet",
"version": "1",
"chainId": 137,
"verifyingContract": ""
},
"types": {
"Call": [
{ "name": "target", "type": "address" },
{ "name": "value", "type": "uint256" },
{ "name": "data", "type": "bytes" }
],
"Batch": [
{ "name": "wallet", "type": "address" },
{ "name": "nonce", "type": "uint256" },
{ "name": "deadline", "type": "uint256" },
{ "name": "calls", "type": "Call[]" }
]
},
"primaryType": "Batch",
"message": {
"wallet": "",
"nonce": "",
"deadline": "",
"calls": [
{
"target": "",
"value": "0",
"data": ""
}
]
}
}
```
使用控制存款钱包的签名者对类型化数据进行签名。以下示例使用 Viem。
```ts theme={null}
import { privateKeyToAccount } from "viem/accounts";
const signer = privateKeyToAccount(
process.env.SIGNER_PRIVATE_KEY as `0x${string}`,
);
const walletBatchSignature = await signer.signTypedData(walletBatchTypedData);
```
使用相同的调用列表和集成 API 密钥提交已签名的批次。
```bash Relayer API Key theme={null}
curl -X POST "https://relayer-v2.polymarket.com/submit" \
-H "Content-Type: application/json" \
-H "RELAYER_API_KEY: " \
-H "RELAYER_API_KEY_ADDRESS: " \
-d '{
"type": "WALLET",
"from": "",
"to": "0x00000000000Fb5C9ADea0298D729A0CB3823Cc07",
"nonce": "",
"signature": "",
"metadata": "",
"depositWalletParams": {
"depositWallet": "",
"deadline": "",
"calls": [
{
"target": "",
"value": "0",
"data": ""
}
]
}
}'
```
```bash Builder API Key theme={null}
curl -X POST "https://relayer-v2.polymarket.com/submit" \
-H "Content-Type: application/json" \
-H "POLY_BUILDER_API_KEY: " \
-H "POLY_BUILDER_TIMESTAMP: " \
-H "POLY_BUILDER_PASSPHRASE: " \
-H "POLY_BUILDER_SIGNATURE: " \
-d '{
"type": "WALLET",
"from": "",
"to": "0x00000000000Fb5C9ADea0298D729A0CB3823Cc07",
"nonce": "",
"signature": "",
"metadata": "",
"depositWalletParams": {
"depositWallet": "",
"deadline": "",
"calls": [
{
"target": "",
"value": "0",
"data": ""
}
]
}
}'
```
对于 Builder API 密钥,请按照[创建新账户](#创建新账户)中的说明,对请求时间戳、方法、路径和精确序列化的正文进行签名。
响应中包含下一步要使用的交易 ID。
```json Response theme={null}
{
"transactionID": "",
"state": "STATE_NEW"
}
```
轮询交易,直到其达到 `STATE_CONFIRMED`。
```bash Relayer API Key theme={null}
curl "https://relayer-v2.polymarket.com/v1/account/transactions/" \
-H "RELAYER_API_KEY: " \
-H "RELAYER_API_KEY_ADDRESS: "
```
```bash Builder API Key theme={null}
curl "https://relayer-v2.polymarket.com/v1/account/transactions/" \
-H "POLY_BUILDER_API_KEY: " \
-H "POLY_BUILDER_TIMESTAMP: " \
-H "POLY_BUILDER_PASSPHRASE: " \
-H "POLY_BUILDER_SIGNATURE: "
```
```json Response theme={null}
{
"transaction_id": "",
"transaction_hash": "",
"state": "STATE_CONFIRMED",
"error_msg": null
}
```
将 `STATE_FAILED` 和 `STATE_INVALID` 视为最终失败状态。
## 设置交易授权
设置 ERC-20 和 ERC-1155 授权,使 Polymarket 的交易所合约能够在下单时支出账户钱包中的 pUSD 和条件代币。对于存款钱包、Safe Wallet 和 Proxy Wallet,这些授权会以免 Gas 交易的形式提交。
使用 Relayer 或 Builder API 密钥创建 `SecureClient`:
```ts Relayer API Key theme={null}
import { createSecureClient, relayerApiKey } from "@polymarket/client";
const client = await createSecureClient({
signer,
wallet: process.env.POLYMARKET_WALLET_ADDRESS,
apiKey: relayerApiKey({
key: process.env.POLYMARKET_RELAYER_API_KEY!,
address: process.env.POLYMARKET_RELAYER_API_KEY_ADDRESS!,
}),
});
```
```ts Builder API Key theme={null}
import { createSecureClient } from "@polymarket/client";
import { builderApiKey } from "@polymarket/client/node";
const client = await createSecureClient({
signer,
wallet: process.env.POLYMARKET_WALLET_ADDRESS,
apiKey: builderApiKey({
key: process.env.POLYMARKET_BUILDER_API_KEY!,
secret: process.env.POLYMARKET_BUILDER_SECRET!,
passphrase: process.env.POLYMARKET_BUILDER_PASSPHRASE!,
}),
});
```
调用 `setupTradingApprovals()` 配置所需额度:
```ts theme={null}
await client.setupTradingApprovals();
```
该方法会检查现有授权,并只提交缺少的授权,因此可以安全地多次调用。
下单时可以自动补全缺少的额度。提前设置可避免在首次下单时执行这项工作。
使用 Relayer 或 Builder API 密钥创建 `AsyncSecureClient`(同步版 `SecureClient` 也支持相同的工作流):
```python Relayer API Key theme={null}
import os
from polymarket import AsyncSecureClient, RelayerApiKey
client = await AsyncSecureClient.create(
private_key=os.environ["SIGNER_PRIVATE_KEY"],
wallet=os.environ["POLYMARKET_WALLET_ADDRESS"],
api_key=RelayerApiKey(
key=os.environ["POLYMARKET_RELAYER_API_KEY"],
address=os.environ["POLYMARKET_RELAYER_API_KEY_ADDRESS"],
),
)
```
```python Builder API Key theme={null}
import os
from polymarket import AsyncSecureClient, BuilderApiKey
client = await AsyncSecureClient.create(
private_key=os.environ["SIGNER_PRIVATE_KEY"],
wallet=os.environ["POLYMARKET_WALLET_ADDRESS"],
api_key=BuilderApiKey(
key=os.environ["POLYMARKET_BUILDER_API_KEY"],
secret=os.environ["POLYMARKET_BUILDER_SECRET"],
passphrase=os.environ["POLYMARKET_BUILDER_PASSPHRASE"],
),
)
```
调用 `setup_trading_approvals()` 配置所需额度:
```python theme={null}
await client.setup_trading_approvals()
```
该方法会检查现有授权,并只提交缺少的授权,因此可以安全地多次调用。
下单时可以自动补全缺少的额度。提前设置可避免在首次下单时执行这项工作。
配置两个 CLOB 交易所合约,使存款钱包能够在标准市场和负风险市场中买卖。
以下步骤展示存款钱包流程。对于 Safe 或 Proxy Wallet
流程,请使用能处理相应钱包特定载荷的 SDK。有关 EOA 交易,请参阅[设置 EOA
交易](#set-up-eoa-trading)。
首先,在构建交易之前检查每项额度,确保批次中只包含缺少的授权。
| 代币 | 要授权的合约 | 合约调用 |
| ---- | ------ | ------------------------------------------- |
| pUSD | 标准交易所 | `approve(StandardExchange, maxUint256)` |
| pUSD | 负风险交易所 | `approve(NegRiskExchange, maxUint256)` |
| 条件代币 | 标准交易所 | `setApprovalForAll(StandardExchange, true)` |
| 条件代币 | 负风险交易所 | `setApprovalForAll(NegRiskExchange, true)` |
通过 pUSD 上的 `allowance(wallet, exchange)` 和条件代币上的 `isApprovedForAll(wallet, exchange)` 读取当前值。
| 合约 | 地址 |
| ------ | -------------------------------------------- |
| pUSD | `0xC011a7E12a19f7B1f670d46F03B03f3342E82DFB` |
| 条件代币 | `0x4D97DCd97eC945f40cF65F87097ACe5EA0476045` |
| 标准交易所 | `0xE111180000d2663C0091e4f400237545B87B996B` |
| 负风险交易所 | `0xe2222d279d744050d28e00520010520000310F59` |
然后,对缺少的 ERC-20 和 ERC-1155 授权调用进行编码。
```solidity ERC-20 Approval theme={null}
function approve(address spender, uint256 amount) returns (bool);
```
```solidity ERC-1155 Approval theme={null}
function setApprovalForAll(address operator, bool approved);
```
为每项缺少的授权构建一个调用。此示例包含全部四项。
```json theme={null}
[
{
"target": "0xC011a7E12a19f7B1f670d46F03B03f3342E82DFB",
"value": "0",
"data": ""
},
{
"target": "0xC011a7E12a19f7B1f670d46F03B03f3342E82DFB",
"value": "0",
"data": ""
},
{
"target": "0x4D97DCd97eC945f40cF65F87097ACe5EA0476045",
"value": "0",
"data": ""
},
{
"target": "0x4D97DCd97eC945f40cF65F87097ACe5EA0476045",
"value": "0",
"data": ""
}
]
```
将授权调用列表用作[执行免 Gas 交易](#执行免-gas-交易)中的 `calls`。获取新的 nonce,对完整批次签名并提交,然后等待 `STATE_CONFIRMED` 后再继续。
最后,更新 CLOB 额度缓存:
```bash Collateral theme={null}
curl -G "https://clob.polymarket.com/balance-allowance/update" \
-H "POLY_ADDRESS: " \
-H "POLY_SIGNATURE: " \
-H "POLY_TIMESTAMP: " \
-H "POLY_API_KEY: " \
-H "POLY_PASSPHRASE: " \
--data-urlencode "asset_type=COLLATERAL" \
--data-urlencode "signature_type=3"
```
```bash Conditional Token theme={null}
curl -G "https://clob.polymarket.com/balance-allowance/update" \
-H "POLY_ADDRESS: " \
-H "POLY_SIGNATURE: " \
-H "POLY_TIMESTAMP: " \
-H "POLY_API_KEY: " \
-H "POLY_PASSPHRASE: " \
--data-urlencode "asset_type=CONDITIONAL" \
--data-urlencode "token_id=" \
--data-urlencode "signature_type=3"
```
使用 [API 身份验证](/cn/getting-started/api#身份验证)中的签名者地址和 CLOB API 凭据,创建新的 ``,并在没有请求正文的情况下生成 ``。查询参数不属于签名路径的一部分:
```text theme={null}
message = + "GET" + "/balance-allowance/update"
clob_l2_signature = urlsafeBase64WithPadding(
HMAC-SHA256(base64Decode(), message)
)
```
在每种代币首次提交卖单之前,刷新其条件代币额度。
***
## 高级选项
探索适用于高级集成的其他钱包和身份验证模式。
### 派生存款钱包地址
如果需要在部署前计算存款钱包地址,请使用以下确定性派生算法。
2026 年 6 月 29 日升级之前部署的存款钱包使用 UUPS
代理。升级后部署的存款钱包使用信标代理。以下算法派生使用信标代理的新存款钱包地址。
```text theme={null}
factory = 0x00000000000Fb5C9ADea0298D729A0CB3823Cc07
beacon = 0x7A18EDfe055488A3128f01F563e5B479D92ffc3a
walletId = bytes32(signer) // left-pad the signer to 32 bytes
args = abi.encode(factory, walletId)
salt = keccak256(args)
beaconInitCodeHash = SoladyLibClone.initCodeHashERC1967BeaconProxy(beacon, args)
depositWallet = CREATE2(factory, salt, beaconInitCodeHash)
```
当前存款钱包工厂和信标请参阅[合约地址](/cn/resources/contracts#钱包工厂合约)。
### 设置 EOA 交易
如果你的 EOA 已列入交易白名单,可将其用作账户钱包。所有链上操作(包括代币授权、ERC-20 转账、拆分、合并和赎回)都直接从 EOA 提交,并需要使用 POL 支付 Gas。
将签名者地址作为 `wallet` 传入。SDK 会将账户识别为 EOA,并跳过存款钱包部署。
```ts theme={null}
import { createSecureClient } from "@polymarket/client";
import { privateKey } from "@polymarket/client/viem";
const signer = privateKey(process.env.SIGNER_PRIVATE_KEY);
const client = await createSecureClient({
signer,
wallet: await signer.getAddress(),
});
```
`approveErc20()`、`approveErc1155ForAll()`、`transferErc20()` 和仓位生命周期方法等会直接从签名者提交交易。例如,设置所有必需的交易授权:
```ts theme={null}
await client.setupTradingApprovals();
```
将签名者地址作为 `wallet` 传入。SDK 会将账户识别为 EOA,并跳过存款钱包部署。
```python theme={null}
import os
from polymarket import AsyncSecureClient
client = await AsyncSecureClient.create(
private_key=os.environ["SIGNER_PRIVATE_KEY"],
wallet=os.environ["POLYMARKET_SIGNER_ADDRESS"],
)
```
`approve_erc20()`、`approve_erc1155_for_all()`、`transfer_erc20()` 和仓位生命周期方法等会直接从签名者提交交易。例如,设置所有必需的交易授权:
```python theme={null}
await client.setup_trading_approvals()
```
首先,授权两个 CLOB 交易所合约支出 pUSD 并管理条件代币。从 EOA 提交每项必需的授权交易,并使用该地址持有的 POL 支付 Gas。
所需授权和合约地址请参阅[设置交易授权](#设置交易授权)。
然后,创建 L1 签名以证明 EOA 的所有权。完整签名流程请参阅 [API 身份验证](/cn/getting-started/api#身份验证)。
```json clobAuthTypedData theme={null}
{
"domain": {
"name": "ClobAuthDomain",
"version": "1",
"chainId": 137
},
"types": {
"ClobAuth": [
{ "name": "address", "type": "address" },
{ "name": "timestamp", "type": "string" },
{ "name": "nonce", "type": "uint256" },
{ "name": "message", "type": "string" }
]
},
"primaryType": "ClobAuth",
"message": {
"address": "",
"timestamp": "",
"nonce": "",
"message": "This message attests that I control the given wallet"
}
}
```
使用 EOA 对 `clobAuthTypedData` 进行签名。返回的签名为 ``。
最后,将签名者地址、时间戳、nonce 和 L1 签名发送到 CLOB,以创建 L2 凭据。
```bash Create theme={null}
curl -X POST "https://clob.polymarket.com/auth/api-key" \
-H "POLY_ADDRESS: " \
-H "POLY_SIGNATURE: " \
-H "POLY_TIMESTAMP: " \
-H "POLY_NONCE: "
```
```bash Derive theme={null}
curl "https://clob.polymarket.com/auth/derive-api-key" \
-H "POLY_ADDRESS: " \
-H "POLY_SIGNATURE: " \
-H "POLY_TIMESTAMP: " \
-H "POLY_NONCE: "
```
保存返回的 L2 凭据,用于经过身份验证的请求和下单。
```json Response theme={null}
{
"apiKey": "",
"secret": "",
"passphrase": ""
}
```
完整的直接 API 下单流程请参阅[提交限价单](/cn/trading/place-orders#下限价单)。
### 远程 Builder 签名
远程 Builder 签名将 Builder API 凭据保存在你的服务器上,同时允许 TypeScript 客户端为需要 Builder 身份验证的操作请求已签名的请求头。
在服务器上验证调用方身份并进行授权,然后对客户端提供的请求详情进行签名。
```ts theme={null}
import { buildHmacSignature } from "@polymarket/client";
export async function POST(request: Request): Promise {
const { body, method, path } = await request.json();
const timestamp = Math.floor(Date.now() / 1000);
return Response.json({
POLY_BUILDER_API_KEY: process.env.POLYMARKET_BUILDER_API_KEY!,
POLY_BUILDER_PASSPHRASE: process.env.POLYMARKET_BUILDER_PASSPHRASE!,
POLY_BUILDER_SIGNATURE: await buildHmacSignature(
process.env.POLYMARKET_BUILDER_SECRET!,
timestamp,
method,
path,
body,
),
POLY_BUILDER_TIMESTAMP: `${timestamp}`,
});
}
```
将用户的签名者和签名端点传给客户端。使用应用程序的会话凭据或自定义请求头验证签名请求。
```ts Cookie Session theme={null}
import { createSecureClient, remoteBuilderSigning } from "@polymarket/client";
const client = await createSecureClient({
signer,
apiKey: remoteBuilderSigning({
url: "/api/builder/sign",
credentials: "include",
}),
});
```
```ts Custom Headers theme={null}
import { createSecureClient, remoteBuilderSigning } from "@polymarket/client";
const client = await createSecureClient({
signer,
apiKey: remoteBuilderSigning({
url: "/api/builder/sign",
headers: {
Authorization: "Bearer eyJhbGciOiJIUzI1NiJ9.…",
},
}),
});
```
Builder API 凭据保留在服务器上;客户端只会收到当前授权请求的请求头。
### 退出信标升级
2026 年 6 月 29 日之后部署的存款钱包使用 [ERC-1967 信标代理](https://eips.ethereum.org/EIPS/eip-1967#beacon-contract-address)。此代理模式通过共享信标为多个钱包解析实现,使 Polymarket 可以在不更改钱包地址的情况下推送实现升级。钱包所有者也可以选择退出,将钱包固定到退出时的当前实现。以下仅限所有者执行的调用会直接提交,并需要使用 POL 支付 Gas。
退出的钱包不会收到未来通过信标升级提供的安全修复、错误修复或新功能。退出前,请审查当前实现并承担维护钱包的责任。
由钱包所有者发送直接链上交易,调用存款钱包的 `pause()`。
从存款钱包工厂读取 `timelockDelay()`,并在钱包暂停后等待该时间间隔结束。
由钱包所有者发送另一笔交易,调用存款钱包的
`optOut()`。这会将钱包固定到交易执行时的当前信标实现。
由钱包所有者调用 `unpause()`,清除暂停状态。
要恢复接收信标升级,请重复暂停和时间锁步骤,调用 `optIn()`,然后取消暂停钱包。重新加入前,请审查信标当前的默认实现。