> ## Documentation Index
> Fetch the complete documentation index at: https://docs.polymarket.com/llms.txt
> Use this file to discover all available pages before exploring further.
# 下单
> 了解如何下单并控制订单的执行方式
通过市价单立即与可用流动性成交,或使用限价单指定价格并等待撮合。
下单前,请选择结果代币,并确认市场[正在接受订单](/cn/market-data/market-details#市场状态)。以下示例假设你已有市场对象;如需查找或获取市场,请参阅[发现市场](/cn/market-data/discover-markets)。
给定一个市场,读取其结果代币 ID:
```ts theme={null}
const yesTokenId = market.outcomes.yes.tokenId!;
const noTokenId = market.outcomes.no.tokenId!;
```
给定一个市场,读取其结果代币 ID:
```python theme={null}
if market.outcomes.yes.token_id is None or market.outcomes.no.token_id is None:
raise RuntimeError("Market token IDs not found")
yes_token_id = market.outcomes.yes.token_id
no_token_id = market.outcomes.no.token_id
```
给定一个市场对象,其结果代币 ID 存储为 JSON 编码的数组:
```json theme={null}
{
"clobTokenIds": "[\"\", \"\"]"
}
```
解析该数组,然后选择你要交易的结果:
```bash theme={null}
TOKEN_ID=""
```
## 限价单
限价单指定你愿意成交的价格,并可挂在订单簿上,直至成交、到期或被你取消。
当控制价格比立即执行更重要时,请使用限价单。
限价单还会定义未成交数量保持有效的时长:
| 有效期 | 行为 | 适用场景 |
| ------------- | ---------------- | -------------- |
| 取消前有效 (GTC) | 保持有效,直至成交或被你取消。 | 订单没有截止时间。 |
| 指定日期前有效 (GTD) | 保持有效,直至你指定的到期时间。 | 订单应在某个已知事件前到期。 |
出于安全阈值考虑,GTD 订单会在标明的到期时间前一分钟失效。若要设置 N 秒的
实际有效期,请使用 `now + 60 + N`。此外,到期时间必须至少在未来 **3
分钟**;更早到期的订单会被拒绝,因此最短实际有效期约为两分钟。
### 下限价单
给定一个 `SecureClient`,下限价单并检查响应:
首先,使用价格和份额数调用 `placeLimitOrder()`。价格必须符合市场的最小价格增量,
数量必须达到最小订单数量。GTC 订单省略 `expiration`;GTD 订单则提供以秒为单位的
Unix 时间戳。
```ts GTC theme={null}
import { OrderSide } from "@polymarket/client";
const response = await client.placeLimitOrder({
tokenId: yesTokenId,
side: OrderSide.BUY,
price: "0.52",
size: "10",
});
// response: OrderResponse
```
```ts GTD theme={null}
import { OrderSide } from "@polymarket/client";
const expiration = Math.floor(Date.now() / 1000) + 60 + 60 * 60;
const response = await client.placeLimitOrder({
tokenId: yesTokenId,
side: OrderSide.BUY,
price: "0.52",
size: "10",
expiration,
});
// response: OrderResponse
```
两个示例都以每份 `0.52` USD 的价格买入 `10` 份。GTD 订单的实际有效期为一小时。
然后,检查 `response.ok` 以确定 CLOB 是否接受了订单:
```ts theme={null}
if (response.ok) {
console.log(response.orderId, response.status);
console.log(response.tradeIds, response.transactionsHashes);
} else {
console.error(response.code, response.message);
}
```
接受订单的响应包含订单 ID 和以下状态之一。如果订单全部或部分成交,
`tradeIds` 集合会标识由此产生的交易;如有可用信息,`transactionsHashes`
会包含这些交易的交易哈希:
| 状态 | 说明 |
| --------- | ---------------- |
| `live` | 订单正在订单簿上挂单。 |
| `matched` | 订单立即与订单簿上的流动性撮合。 |
| `delayed` | 订单可成交,但受到撮合延迟。 |
被拒绝的订单返回 `ok: false`,并附带代码和消息。
给定一个 `AsyncSecureClient`,下限价单并检查响应。同步 `SecureClient`
提供相同的方法。
首先,使用价格和份额数调用 `place_limit_order()`。价格必须符合市场的最小价格增量,
数量必须达到最小订单数量。GTC 订单省略 `expiration`;GTD 订单则提供以秒为单位的
Unix 时间戳。
```python GTC theme={null}
response = await client.place_limit_order(
token_id=yes_token_id,
side="BUY",
price="0.52",
size="10",
)
# response: OrderResponse
```
```python GTD theme={null}
import time
expiration = int(time.time()) + 60 + 60 * 60
response = await client.place_limit_order(
token_id=yes_token_id,
side="BUY",
price="0.52",
size="10",
expiration=expiration,
)
# response: OrderResponse
```
两个示例都以每份 `0.52` USD 的价格买入 `10` 份。GTD 订单的实际有效期为一小时。
然后,检查 `response.ok` 以确定 CLOB 是否接受了订单:
```python theme={null}
if response.ok:
print(response.order_id, response.status)
print(response.trade_ids, response.transactions_hashes)
else:
print(response.code, response.message)
```
接受订单的响应包含订单 ID 和以下状态之一。如果订单全部或部分成交,
`trade_ids` 集合会标识由此产生的交易;如有可用信息,`transactions_hashes`
会包含这些交易的交易哈希:
| 状态 | 说明 |
| --------- | ---------------- |
| `live` | 订单正在订单簿上挂单。 |
| `matched` | 订单立即与订单簿上的流动性撮合。 |
| `delayed` | 订单可成交,但受到撮合延迟。 |
被拒绝的订单返回 `ok=False`,并附带代码和消息。
根据价格和数量构建限价单,然后签名并提交:
首先,获取当前订单簿,以读取市场的交易约束和交易所类型:
```bash theme={null}
curl "https://clob.polymarket.com/book?token_id=$TOKEN_ID"
```
```json theme={null}
{
"asset_id": "",
"bids": [{ "price": "0.50", "size": "40" }],
"asks": [{ "price": "0.54", "size": "30" }],
"min_order_size": "5",
"tick_size": "0.01",
"neg_risk": false
}
```
其中:
* `min_order_size` 是 CLOB 接受的单笔订单最小份额数。
* `neg_risk` 表示市场是否属于[负风险组](/cn/concepts/negative-risk),
从而在签名和提交订单时使用 Neg Risk Exchange 合约。
然后,选择符合 `tick_size` 的价格和达到 `min_order_size` 的份额数量。
使用最小变动价位确定所需精度:
| 最小变动价位 | 价格小数位数 | 数量小数位数 | 金额小数位数 |
| -------- | -----: | -----: | -----: |
| `0.1` | 1 | 2 | 3 |
| `0.01` | 2 | 2 | 4 |
| `0.005` | 3 | 2 | 5 |
| `0.0025` | 4 | 2 | 6 |
| `0.001` | 3 | 2 | 5 |
| `0.0001` | 4 | 2 | 6 |
如果你的集成会存储 `tick_size` 供后续订单使用,请监听[市场
数据流](/cn/market-data/realtime-data#市场数据流)上的 `tick_size_change`
事件,并在其变化时替换已存储的值。CLOB
会拒绝价格不符合市场当前最小变动价位的订单。
两个方向对价格和数量的映射方式不同:
* 对于 BUY,`makerAmount` 是 `price × size` USD,`takerAmount` 是份额数。
* 对于 SELL,`makerAmount` 是份额数,`takerAmount` 是 `price × size` USD。
按以下顺序应用表中的精度:
1. 价格使用不超过**价格小数位数**的小数位。
2. 将份额数量向下舍入至**数量小数位数**。
3. 计算 USD 金额。如果超过**金额小数位数**,先向上舍入至
**金额小数位数 + 4**,再向下舍入至**金额小数位数**。
接下来,确认舍入后的份额数量仍达到 `min_order_size`,然后将两个金额转换为
六位小数精度的整数。
以 `0.52` 的价格 BUY `10` 份时,USD 金额为 `5.20`,份额数量高于最低值 `5`。
编码后的值为:
```json theme={null}
{
"makerAmount": "5200000",
"takerAmount": "10000000"
}
```
然后,使用第一步中订单簿返回的 `neg_risk` 值,选择用作 EIP-712
验证合约的 Exchange 合约:
| 市场 | `exchange_address` |
| --- | -------------------------------------------- |
| 标准 | `0xE111180000d2663C0091e4f400237545B87B996B` |
| 负风险 | `0xe2222d279d744050d28e00520010520000310F59` |
然后,根据账户钱包确定其余占位符:
| 钱包 | `signature_type` | `maker_address` | `order_signer_address` |
| ------- | ---------------: | --------------- | ---------------------- |
| 存款钱包 | `3` | 存款钱包地址 | 存款钱包地址 |
| 代理钱包 | `1` | 代理钱包地址 | 账户签名者地址 |
| Safe 钱包 | `2` | Safe 钱包地址 | 账户签名者地址 |
| EOA | `0` | EOA 地址 | EOA 地址 |
接下来,为所选钱包创建 EIP-712 类型化数据:
```json Deposit Wallet Typed Data theme={null}
{
"domain": {
"name": "Polymarket CTF Exchange",
"version": "2",
"chainId": 137,
"verifyingContract": ""
},
"types": {
"Order": [
{ "name": "salt", "type": "uint256" },
{ "name": "maker", "type": "address" },
{ "name": "signer", "type": "address" },
{ "name": "tokenId", "type": "uint256" },
{ "name": "makerAmount", "type": "uint256" },
{ "name": "takerAmount", "type": "uint256" },
{ "name": "side", "type": "uint8" },
{ "name": "signatureType", "type": "uint8" },
{ "name": "timestamp", "type": "uint256" },
{ "name": "metadata", "type": "bytes32" },
{ "name": "builder", "type": "bytes32" }
],
"TypedDataSign": [
{ "name": "contents", "type": "Order" },
{ "name": "name", "type": "string" },
{ "name": "version", "type": "string" },
{ "name": "chainId", "type": "uint256" },
{ "name": "verifyingContract", "type": "address" },
{ "name": "salt", "type": "bytes32" }
]
},
"primaryType": "TypedDataSign",
"message": {
"contents": {
"salt": "479249096354",
"maker": "",
"signer": "",
"tokenId": "",
"makerAmount": "5200000",
"takerAmount": "10000000",
"side": 0,
"signatureType": 3,
"timestamp": "",
"metadata": "0x0000000000000000000000000000000000000000000000000000000000000000",
"builder": "0x0000000000000000000000000000000000000000000000000000000000000000"
},
"name": "DepositWallet",
"version": "1",
"chainId": 137,
"verifyingContract": "",
"salt": "0x0000000000000000000000000000000000000000000000000000000000000000"
}
}
```
```json Proxy, Safe, or EOA Typed Data theme={null}
{
"domain": {
"name": "Polymarket CTF Exchange",
"version": "2",
"chainId": 137,
"verifyingContract": ""
},
"types": {
"Order": [
{ "name": "salt", "type": "uint256" },
{ "name": "maker", "type": "address" },
{ "name": "signer", "type": "address" },
{ "name": "tokenId", "type": "uint256" },
{ "name": "makerAmount", "type": "uint256" },
{ "name": "takerAmount", "type": "uint256" },
{ "name": "side", "type": "uint8" },
{ "name": "signatureType", "type": "uint8" },
{ "name": "timestamp", "type": "uint256" },
{ "name": "metadata", "type": "bytes32" },
{ "name": "builder", "type": "bytes32" }
]
},
"primaryType": "Order",
"message": {
"salt": "479249096354",
"maker": "",
"signer": "",
"tokenId": "",
"makerAmount": "5200000",
"takerAmount": "10000000",
"side": 0,
"signatureType": 1,
"timestamp": "",
"metadata": "0x0000000000000000000000000000000000000000000000000000000000000000",
"builder": "0x0000000000000000000000000000000000000000000000000000000000000000"
}
}
```
其中:
* BUY 的 `side` 为 `0`,SELL 的 `side` 为 `1`。
* 每个订单都应使用新的随机 `salt` 值。由于请求正文会将其序列化为 JSON 数字,
JavaScript 集成应确保该值不超过 `Number.MAX_SAFE_INTEGER`。
然后,使用账户签名者签署类型化数据。存款钱包需要封装原始签名以进行 ERC-7739
验证。代理钱包、Safe 钱包和 EOA 则提交直接签署 Exchange `Order`
类型化数据后返回的标准签名。
请参阅以下使用 Viem 的示例:
```js Deposit Wallet theme={null}
import { privateKeyToAccount } from "viem/accounts";
const signer = privateKeyToAccount(process.env.SIGNER_PRIVATE_KEY);
const innerSignature = await signer.signTypedData(typedData);
const signature = wrapDepositWalletSignature(typedData, innerSignature);
```
```js Proxy, Safe, or EOA theme={null}
import { privateKeyToAccount } from "viem/accounts";
const signer = privateKeyToAccount(process.env.SIGNER_PRIVATE_KEY);
const signature = await signer.signTypedData(typedData);
```
```js wrapDepositWalletSignature() theme={null}
import { concatHex, encodeAbiParameters, keccak256, toHex } from "viem";
const ORDER_TYPE =
"Order(uint256 salt,address maker,address signer,uint256 tokenId,uint256 makerAmount,uint256 takerAmount,uint8 side,uint8 signatureType,uint256 timestamp,bytes32 metadata,bytes32 builder)";
const EIP712_DOMAIN_TYPE =
"EIP712Domain(string name,string version,uint256 chainId,address verifyingContract)";
function wrapDepositWalletSignature(typedData, innerSignature) {
const order = typedData.message.contents;
const exchangeDomain = typedData.domain;
const appDomainSeparator = keccak256(
encodeAbiParameters(
[
{ type: "bytes32" },
{ type: "bytes32" },
{ type: "bytes32" },
{ type: "uint256" },
{ type: "address" },
],
[
keccak256(toHex(EIP712_DOMAIN_TYPE)),
keccak256(toHex(exchangeDomain.name)),
keccak256(toHex(exchangeDomain.version)),
BigInt(exchangeDomain.chainId),
exchangeDomain.verifyingContract,
],
),
);
const contentsHash = keccak256(
encodeAbiParameters(
[
{ type: "bytes32" },
{ type: "uint256" },
{ type: "address" },
{ type: "address" },
{ type: "uint256" },
{ type: "uint256" },
{ type: "uint256" },
{ type: "uint8" },
{ type: "uint8" },
{ type: "uint256" },
{ type: "bytes32" },
{ type: "bytes32" },
],
[
keccak256(toHex(ORDER_TYPE)),
BigInt(order.salt),
order.maker,
order.signer,
BigInt(order.tokenId),
BigInt(order.makerAmount),
BigInt(order.takerAmount),
order.side,
order.signatureType,
BigInt(order.timestamp),
order.metadata,
order.builder,
],
),
);
return concatHex([
innerSignature,
appDomainSeparator,
contentsHash,
toHex(ORDER_TYPE),
toHex(ORDER_TYPE.length, { size: 2 }),
]);
}
```
在最终请求正文中选择未成交订单保持有效的时长。对于 GTC 订单,将 `orderType`
设为 `"GTC"`,将 `expiration` 设为 `"0"`。对于 GTD 订单,将 `orderType`
设为 `"GTD"`,并将 `expiration` 设为以秒为单位的 Unix 时间戳。
```bash GTC theme={null}
curl -X POST "https://clob.polymarket.com/order" \
-H "Content-Type: application/json" \
-H "POLY_ADDRESS: " \
-H "POLY_API_KEY: " \
-H "POLY_PASSPHRASE: " \
-H "POLY_SIGNATURE: " \
-H "POLY_TIMESTAMP: " \
--data '{
"deferExec": false,
"order": {
"builder": "0x0000000000000000000000000000000000000000000000000000000000000000",
"expiration": "0",
"maker": "",
"makerAmount": "5200000",
"metadata": "0x0000000000000000000000000000000000000000000000000000000000000000",
"salt": 479249096354,
"side": "BUY",
"signature": "",
"signatureType": 3,
"signer": "",
"takerAmount": "10000000",
"timestamp": "",
"tokenId": ""
},
"orderType": "GTC",
"owner": ""
}'
```
```bash GTD theme={null}
curl -X POST "https://clob.polymarket.com/order" \
-H "Content-Type: application/json" \
-H "POLY_ADDRESS: " \
-H "POLY_API_KEY: " \
-H "POLY_PASSPHRASE: " \
-H "POLY_SIGNATURE: " \
-H "POLY_TIMESTAMP: " \
--data '{
"deferExec": false,
"order": {
"builder": "0x0000000000000000000000000000000000000000000000000000000000000000",
"expiration": "",
"maker": "",
"makerAmount": "5200000",
"metadata": "0x0000000000000000000000000000000000000000000000000000000000000000",
"salt": 479249096354,
"side": "BUY",
"signature": "",
"signatureType": 3,
"signer": "",
"takerAmount": "10000000",
"timestamp": "",
"tokenId": ""
},
"orderType": "GTD",
"owner": ""
}'
```
使用 [API 身份验证](/cn/getting-started/api#身份验证)中的签名者地址和
CLOB API 凭据,创建新的 ``,并根据通过网络发送的
精确序列化正文生成 ``:
```text theme={null}
body =
message = + "POST" + "/order" + body
clob_l2_signature = urlsafeBase64WithPadding(
HMAC-SHA256(base64Decode(), message)
)
```
最后,检查 `success` 以确定 CLOB 是否接受了订单。成功响应包含订单 ID
及其插入状态;失败响应则在 `errorMsg` 中包含原因:
```json Success theme={null}
{
"success": true,
"errorMsg": "",
"orderID": "",
"status": "live",
"makingAmount": "",
"takingAmount": "",
"transactionsHashes": [""],
"tradeIDs": [""]
}
```
```json Failure theme={null}
{
"success": false,
"errorMsg": "not enough balance / allowance",
"orderID": "",
"status": "",
"makingAmount": "",
"takingAmount": ""
}
```
成功响应具有以下状态之一。订单全部或部分成交时,`tradeIDs` 集合会标识
由此产生的交易;如有可用信息,`transactionsHashes` 会包含这些交易的交易哈希:
| 状态 | 说明 |
| ----------- | ------------------- |
| `live` | 订单正在订单簿上挂单。 |
| `matched` | 订单立即与订单簿上的流动性撮合。 |
| `delayed` | 订单可成交,但受到撮合延迟。 |
| `unmatched` | 订单可成交,但延迟失败;下单仍然成功。 |
### 仅挂单订单
仅挂单订单只会增加流动性:如果订单会立即与订单簿撮合,则会被拒绝,而不会吃单。
使用这种订单可确保你以做市商身份报价。
做市商使用仅挂单订单,通过在订单簿上挂单来增加流动性。
给定一个 `SecureClient`,在下限价单时设置 `postOnly`:
```ts theme={null}
const response = await client.placeLimitOrder({
tokenId: yesTokenId,
side: OrderSide.BUY,
price: "0.52",
size: "10",
postOnly: true,
});
// response: OrderResponse
```
给定一个 `AsyncSecureClient`,在下限价单时设置 `post_only`。
同步 `SecureClient` 提供相同的方法。
```python theme={null}
response = await client.place_limit_order(
token_id=yes_token_id,
side="BUY",
price="0.52",
size="10",
post_only=True,
)
# response: OrderResponse
```
按照[下限价单](#下限价单)中的 API 工作流操作,然后在最终请求中与 GTC 或 GTD
`orderType` 一同添加 `postOnly: true`。例如,提交一个 GTC 仅挂单订单:
```bash theme={null}
curl -X POST "https://clob.polymarket.com/order" \
-H "Content-Type: application/json" \
-H "POLY_ADDRESS: " \
-H "POLY_API_KEY: " \
-H "POLY_PASSPHRASE: " \
-H "POLY_SIGNATURE: " \
-H "POLY_TIMESTAMP: " \
--data '{
"deferExec": false,
"order": {
"builder": "0x0000000000000000000000000000000000000000000000000000000000000000",
"expiration": "0",
"maker": "",
"makerAmount": "5200000",
"metadata": "0x0000000000000000000000000000000000000000000000000000000000000000",
"salt": 479249096354,
"side": "BUY",
"signature": "",
"signatureType": 3,
"signer": "",
"takerAmount": "10000000",
"timestamp": "",
"tokenId": ""
},
"orderType": "GTC",
"owner": "",
"postOnly": true
}'
```
## 市价单
市价单与限价单使用相同的底层订单,但会根据当前订单簿流动性得出可成交价格。
因此它可以立即执行,而不是挂在订单簿上。当执行比设定精确价格更重要时,请使用市价单。
在决定买入或卖出多少之前,请阅读市场的[交易
约束](/cn/market-data/market-details#交易约束)。
### 下市价单
以下示例使用 Fill and Kill (FAK),它会立即成交可用流动性并取消任何剩余数量。
有关 Fill or Kill (FOK),请参阅[市价单类型](#市价单类型)。
给定一个 `SecureClient`,估算价格并下市价单:
首先,调用 `estimateMarketPrice()`,确定订单在当前订单簿深度下会触及的价格水平。
对于 BUY,`amount` 是要花费的 USD 名义金额。对于 SELL,`shares`
是要卖出的份额数,而不是其 USD 价值。
```ts Buy theme={null}
import { OrderSide, OrderType } from "@polymarket/client";
const estimatedBuyPrice = await client.estimateMarketPrice({
tokenId: yesTokenId,
side: OrderSide.BUY,
amount: "10",
orderType: OrderType.FAK,
});
// estimatedBuyPrice: number
```
```ts Sell theme={null}
import { OrderSide, OrderType } from "@polymarket/client";
const estimatedSellPrice = await client.estimateMarketPrice({
tokenId: yesTokenId,
side: OrderSide.SELL,
shares: "10",
orderType: OrderType.FAK,
});
// estimatedSellPrice: number
```
在这些示例中,`amount: "10"` 表示花费 10 USD,而 `shares: "10"`
表示卖出 10 份。
估算结果是当前订单簿的快照。提交订单前,可用价格可能发生变化。
然后,如果估算价格可以接受,将其作为 BUY 的最高价格或 SELL 的最低价格,
并下市价单:
```ts Buy theme={null}
const response = await client.placeMarketOrder({
tokenId: yesTokenId,
side: OrderSide.BUY,
amount: "10",
maxPrice: estimatedBuyPrice,
orderType: OrderType.FAK,
});
// response: OrderResponse
```
```ts Sell theme={null}
const response = await client.placeMarketOrder({
tokenId: yesTokenId,
side: OrderSide.SELL,
shares: "10",
minPrice: estimatedSellPrice,
orderType: OrderType.FAK,
});
// response: OrderResponse
```
`maxPrice` 可防止 BUY 跨越更高价格,`minPrice` 可防止 SELL 跨越更低价格。
如果订单簿在提交前发生变化,订单可能仅部分成交或完全不成交。
最后,检查 `response.ok` 以确定 CLOB 是否接受了订单:
```ts theme={null}
if (response.ok) {
console.log(response.orderId, response.status);
console.log(response.tradeIds, response.transactionsHashes);
} else {
console.error(response.code, response.message);
}
```
接受订单的响应包含订单 ID 和以下状态之一。如果订单全部或部分成交,
`tradeIds` 会标识由此产生的交易;如有可用信息,`transactionsHashes`
会包含这些交易的交易哈希:
| 状态 | 说明 |
| --------- | ---------------- |
| `live` | 订单正在订单簿上挂单。 |
| `matched` | 订单立即与订单簿上的流动性撮合。 |
| `delayed` | 订单可成交,但受到撮合延迟。 |
被拒绝的订单返回 `ok: false`,并附带代码和消息。
给定一个 `AsyncSecureClient`,估算价格并下市价单。同步 `SecureClient`
提供相同的方法。
首先,调用 `estimate_market_price()`,确定订单在当前订单簿深度下会触及的价格水平。
对于 BUY,`amount` 是要花费的 USD 名义金额。对于 SELL,`shares`
是要卖出的份额数,而不是其 USD 价值。
```python Buy theme={null}
estimated_buy_price = await client.estimate_market_price(
token_id=yes_token_id,
side="BUY",
amount="10",
order_type="FAK",
)
# estimated_buy_price: Decimal
```
```python Sell theme={null}
estimated_sell_price = await client.estimate_market_price(
token_id=yes_token_id,
side="SELL",
shares="10",
order_type="FAK",
)
# estimated_sell_price: Decimal
```
在这些示例中,`amount="10"` 表示花费 10 USD,而 `shares="10"`
表示卖出 10 份。
估算结果是当前订单簿的快照。提交订单前,可用价格可能发生变化。
然后,如果估算价格可以接受,将其作为 BUY 的最高价格或 SELL 的最低价格,
并下市价单:
```python Buy theme={null}
response = await client.place_market_order(
token_id=yes_token_id,
side="BUY",
amount="10",
max_price=estimated_buy_price,
order_type="FAK",
)
# response: OrderResponse
```
```python Sell theme={null}
response = await client.place_market_order(
token_id=yes_token_id,
side="SELL",
shares="10",
min_price=estimated_sell_price,
order_type="FAK",
)
# response: OrderResponse
```
`max_price` 可防止 BUY 跨越更高价格,`min_price` 可防止 SELL 跨越更低价格。
如果订单簿在提交前发生变化,订单可能仅部分成交或完全不成交。
最后,检查 `response.ok` 以确定 CLOB 是否接受了订单:
```python theme={null}
if response.ok:
print(response.order_id, response.status)
print(response.trade_ids, response.transactions_hashes)
else:
print(response.code, response.message)
```
接受订单的响应包含订单 ID 和以下状态之一。如果订单全部或部分成交,
`trade_ids` 会标识由此产生的交易;如有可用信息,`transactions_hashes`
会包含这些交易的交易哈希:
| 状态 | 说明 |
| --------- | ---------------- |
| `live` | 订单正在订单簿上挂单。 |
| `matched` | 订单立即与订单簿上的流动性撮合。 |
| `delayed` | 订单可成交,但受到撮合延迟。 |
被拒绝的订单返回 `ok=False`,并附带代码和消息。
市价单复用[下限价单](#下限价单)中的构建和签名流程。从当前订单簿开始,
计算市价单金额,然后使用这些值构建并签署相同的 Exchange 订单。
以下步骤说明订单与当前流动性成交时需要做出的更改:
首先,获取当前订单簿:
```bash theme={null}
curl "https://clob.polymarket.com/book?token_id=$TOKEN_ID"
```
```json theme={null}
{
"asset_id": "",
"bids": [{ "price": "0.50", "size": "40" }],
"asks": [
{ "price": "0.54", "size": "30" },
{ "price": "0.52", "size": "25" }
],
"min_order_size": "5",
"tick_size": "0.01",
"neg_risk": false
}
```
根据订单方向估算价格:
* 对于 BUY,从最优价格开始向上遍历卖单并累加 `price × size`,直到总额达到
你要花费的 USD 金额。使用最后一个价格作为最高价格。
* 对于 SELL,从最优价格开始向下遍历买单,直到累计数量达到你要卖出的份额数。
使用最后一个价格作为最低价格。
在此示例中,10 USD 的 BUY 可以完全以 `0.52` 成交,因此最高价格为 `0.52`。
如果订单簿在提交前发生变化,请重新计算估算价格。
使用上述限价单工作流中的精度表,但要根据订单方向映射金额:
* 对于 BUY,`makerAmount` 是要花费的 USD 金额,`takerAmount` 是
`makerAmount ÷ 最高价格` 份。
* 对于 SELL,`makerAmount` 是份额数,`takerAmount` 是
`makerAmount × 最低价格` USD。
将价格和输入金额向下舍入至表中的**价格小数位数**和**数量小数位数**。
计算 `takerAmount` 后,先向上舍入至**金额小数位数 + 4**,再舍入至
**金额小数位数**。这样可以保持 BUY 的最高价格或 SELL 的最低价格。
最高价格为 `0.52`、最小变动价位为 `0.01` 的 10 USD BUY 会得到 `19.2308` 份,
高于订单簿中的最低 5 份。转换为六位小数精度的整数后,金额为:
```json theme={null}
{
"makerAmount": "10000000",
"takerAmount": "19230800"
}
```
使用订单簿中的 `neg_risk` 值选择 Exchange 合约,然后按照限价单工作流所示,
确定钱包的 maker、签名者和签名类型。构建相同的 EIP-712 订单类型化数据,
并用上面计算的市价单金额替换 `makerAmount` 和 `takerAmount`。
使用账户签名者签名。存款钱包使用 `TypedDataSign` 载荷,并封装生成的签名以进行
ERC-7739 验证;代理钱包、Safe 钱包和 EOA 直接签署 Exchange `Order`。
将 `orderType` 设为 `"FAK"` 并提交订单:
```bash theme={null}
curl -X POST "https://clob.polymarket.com/order" \
-H "Content-Type: application/json" \
-H "POLY_ADDRESS: " \
-H "POLY_API_KEY: " \
-H "POLY_PASSPHRASE: " \
-H "POLY_SIGNATURE: " \
-H "POLY_TIMESTAMP: " \
--data '{
"deferExec": false,
"order": {
"builder": "0x0000000000000000000000000000000000000000000000000000000000000000",
"expiration": "0",
"maker": "",
"makerAmount": "10000000",
"metadata": "0x0000000000000000000000000000000000000000000000000000000000000000",
"salt": 479249096354,
"side": "BUY",
"signature": "",
"signatureType": 3,
"signer": "",
"takerAmount": "19230800",
"timestamp": "",
"tokenId": ""
},
"orderType": "FAK",
"owner": ""
}'
```
使用 [API 身份验证](/cn/getting-started/api#身份验证)中的签名者地址和
CLOB API 凭据,创建新的 ``,并根据通过网络发送的
精确序列化正文生成 ``:
```text theme={null}
body =
message = + "POST" + "/order" + body
clob_l2_signature = urlsafeBase64WithPadding(
HMAC-SHA256(base64Decode(), message)
)
```
市价单的 `expiration` 必须为 `"0"`。
最后,检查 `success`。FAK 订单可能全部或部分成交;任何未成交的剩余数量都会被取消。
成功成交由 `tradeIDs` 标识;`transactionsHashes` 包含返回响应时可用的交易哈希。
被拒绝的订单会在 `errorMsg` 中说明失败原因:
```json Success theme={null}
{
"success": true,
"errorMsg": "",
"orderID": "",
"status": "matched",
"makingAmount": "",
"takingAmount": "",
"transactionsHashes": [""],
"tradeIDs": [""]
}
```
```json Failure theme={null}
{
"success": false,
"errorMsg": "not enough balance / allowance",
"orderID": "",
"status": "",
"makingAmount": "",
"takingAmount": ""
}
```
### 限制市价买单支出
市价 BUY 的金额是扣费前的 USD 名义金额。适用的[平台
费用](/cn/market-data/market-details#交易费用)和[构建者吃单
费用](/cn/programs/builders/fees)会在此基础上收取。当总成本必须保持在固定预算内时,
请设置包含所有费用的支出上限。
将 `maxSpend` 设为你愿意支付的最高金额(含费用):
```ts theme={null}
const response = await client.placeMarketOrder({
tokenId: yesTokenId,
side: OrderSide.BUY,
amount: "10",
maxSpend: "10",
maxPrice: estimatedBuyPrice,
orderType: OrderType.FAK,
});
```
此处,`amount: "10"` 请求扣费前买入 10 USD,而 `maxSpend: "10"`
将总支出限制为 10 USD。SDK 会减少签名的买入金额,使订单及其费用不超过上限。
省略 `maxSpend` 则会在 `amount` 之上另付费用。
将 `max_spend` 设为你愿意支付的最高金额(含费用):
```python theme={null}
response = await client.place_market_order(
token_id=yes_token_id,
side="BUY",
amount="10",
max_spend="10",
max_price=estimated_buy_price,
order_type="FAK",
)
```
此处,`amount="10"` 请求扣费前买入 10 USD,而 `max_spend="10"`
将总支出限制为 10 USD。SDK 会减少签名的买入金额,使订单及其费用不超过上限。
省略 `max_spend` 则会在 `amount` 之上另付费用。
签名前,减少 `makerAmount`,使订单名义金额加上适用的平台和构建者吃单费用
不超过预期上限。然后在计算上述市价单金额时使用经费用调整后的值。
### 市价单类型
市价单根据是否接受部分成交,使用以下两种执行类型之一:
| 类型 | 行为 |
| ------------------- | ------------------------- |
| Fill and Kill (FAK) | 立即与可用流动性成交,并取消任何未成交的剩余数量。 |
| Fill or Kill (FOK) | 立即成交整个订单,否则完全不成交。 |
在 `SecureClient` 上调用 `placeMarketOrder()` 时设置 `orderType`。
默认类型为 Fill and Kill。
```ts FAK theme={null}
import { OrderSide, OrderType } from "@polymarket/client";
const response = await client.placeMarketOrder({
tokenId: yesTokenId,
side: OrderSide.BUY,
amount: "10",
orderType: OrderType.FAK,
});
// response: OrderResponse
```
```ts FOK theme={null}
import { OrderSide, OrderType } from "@polymarket/client";
const response = await client.placeMarketOrder({
tokenId: yesTokenId,
side: OrderSide.BUY,
amount: "10",
orderType: OrderType.FOK,
});
// response: OrderResponse
```
在 `AsyncSecureClient` 上调用 `place_market_order()` 时设置 `order_type`。
默认类型为 Fill and Kill,同步 `SecureClient` 提供相同的方法。
```python FAK theme={null}
response = await client.place_market_order(
token_id=yes_token_id,
side="BUY",
amount="10",
order_type="FAK",
)
# response: OrderResponse
```
```python FOK theme={null}
response = await client.place_market_order(
token_id=yes_token_id,
side="BUY",
amount="10",
order_type="FOK",
)
# response: OrderResponse
```
`orderType` 不属于已签名的 EIP-712 订单类型化数据。在顶层 `/order`
正文中,将它与已签名订单一同设为 `FAK` 或 `FOK`:
```json theme={null}
{
"deferExec": false,
"order": { "…": "…" },
"orderType": "FOK",
"owner": ""
}
```
## 分别创建和提交
当你需要检查订单、临时存储订单或将其加入后续批次时,可以创建并签署订单而不提交。
给定一个 `SecureClient`,在本地创建已签名订单,准备好后再提交:
```ts theme={null}
const signedOrder = await client.createLimitOrder({
tokenId: yesTokenId,
side: OrderSide.BUY,
price: "0.52",
size: "10",
});
// signedOrder: SignedOrder
const response = await client.postOrder(signedOrder);
// response: OrderResponse
```
给定一个 `AsyncSecureClient`,在本地创建已签名订单,准备好后再提交。
同步 `SecureClient` 提供相同的方法。
```python theme={null}
signed_order = await client.create_limit_order(
token_id=yes_token_id,
side="BUY",
price="0.52",
size="10",
)
# signed_order: SignedOrder
response = await client.post_order(signed_order)
# response: OrderResponse
```
API 本身分为两步:签名在本地完成,提交则是独立的 HTTP 请求。按照
[下限价单](#下限价单)中的说明构建并签署订单,然后保留已签名订单,
直至准备好提交。
## 批量提交订单
在一个请求中提交多个已签名订单。这适合在做市时跨多个价格水平放置阶梯报价。
给定一个 `SecureClient`,创建每个已签名订单,然后将它们一并传给
`postOrders()`:
```ts theme={null}
const firstOrder = await client.createLimitOrder({
tokenId: yesTokenId,
side: OrderSide.BUY,
price: "0.51",
size: "10",
});
const secondOrder = await client.createLimitOrder({
tokenId: yesTokenId,
side: OrderSide.BUY,
price: "0.52",
size: "10",
});
const responses = await client.postOrders([firstOrder, secondOrder]);
// responses: OrderResponse[]
```
```json Example theme={null}
[
{
"ok": true,
"orderId": "0x0827…",
"status": "live",
"makingAmount": "0",
"takingAmount": "0",
"transactionsHashes": [],
"tradeIds": []
},
{
"ok": true,
"orderId": "0x09f3…",
"status": "live",
"makingAmount": "0",
"takingAmount": "0",
"transactionsHashes": [],
"tradeIds": []
}
]
```
`postOrders` 每次调用接受 1 至 15 个已签名订单。`responses` 中的每个条目
都可能被单独接受或拒绝,因此请检查每个条目的 `ok`,不要假定整个批次会一同成功或失败。
给定一个 `AsyncSecureClient`,创建每个已签名订单,然后将它们一并传给
`post_orders()`。同步 `SecureClient` 提供相同的方法。
```python theme={null}
first_order = await client.create_limit_order(
token_id=yes_token_id,
side="BUY",
price="0.51",
size="10",
)
second_order = await client.create_limit_order(
token_id=yes_token_id,
side="BUY",
price="0.52",
size="10",
)
responses = await client.post_orders([first_order, second_order])
# responses: tuple[OrderResponse, ...]
```
```python Type theme={null}
tuple[OrderResponse, ...]
```
```json Example theme={null}
[
{
"ok": true,
"order_id": "0x0827…",
"status": "live",
"making_amount": "0",
"taking_amount": "0",
"trade_ids": [],
"transactions_hashes": []
},
{
"ok": true,
"order_id": "0x09f3…",
"status": "live",
"making_amount": "0",
"taking_amount": "0",
"trade_ids": [],
"transactions_hashes": []
}
]
```
`post_orders` 每次调用接受 1 至 15 个已签名订单。`responses` 中的每个条目
都可能被单独接受或拒绝,因此请检查每个条目的 `ok`,不要假定整个批次会一同成功或失败。
向 `/orders` 发送包含 1 至 15 个已签名订单条目的数组:
```bash theme={null}
curl -X POST "https://clob.polymarket.com/orders" \
-H "Content-Type: application/json" \
-H "POLY_ADDRESS: " \
-H "POLY_API_KEY: " \
-H "POLY_PASSPHRASE: " \
-H "POLY_SIGNATURE: " \
-H "POLY_TIMESTAMP: " \
--data '[
{
"deferExec": false,
"order": { "…": "…" },
"orderType": "GTC",
"owner": ""
},
{
"deferExec": false,
"order": { "…": "…" },
"orderType": "GTC",
"owner": ""
}
]'
```
使用 [API 身份验证](/cn/getting-started/api#身份验证)中的签名者地址和
CLOB API 凭据,创建新的 ``,并根据通过网络发送的
精确序列化数组生成 ``:
```text theme={null}
body =
message = + "POST" + "/orders" + body
clob_l2_signature = urlsafeBase64WithPadding(
HMAC-SHA256(base64Decode(), message)
)
```
每个条目与单个 `/order` 请求使用相同的结构。响应会为每个已提交订单包含一个结果。
例如,一个订单可能被接受,而另一个被拒绝:
```json theme={null}
[
{
"success": true,
"errorMsg": "",
"orderID": "",
"status": "live",
"makingAmount": "",
"takingAmount": "",
"transactionsHashes": [],
"tradeIDs": []
},
{
"success": false,
"errorMsg": "not enough balance / allowance",
"orderID": "",
"status": "",
"makingAmount": "",
"takingAmount": ""
}
]
```
请检查每个结果,不要将整个批次视为一次成功或失败。
## 构建者归因
作为[构建者计划](/cn/programs/builders/overview)的一部分,请将构建者代码附加到订单,
以便将已撮合交易计入你的构建者资料。该代码是标识你资料的 32 字节十六进制字符串。
### 附加构建者代码
在构建者账户中,打开 polymarket.com → 设置 → 构建者,然后从资料中复制
**构建者代码**:
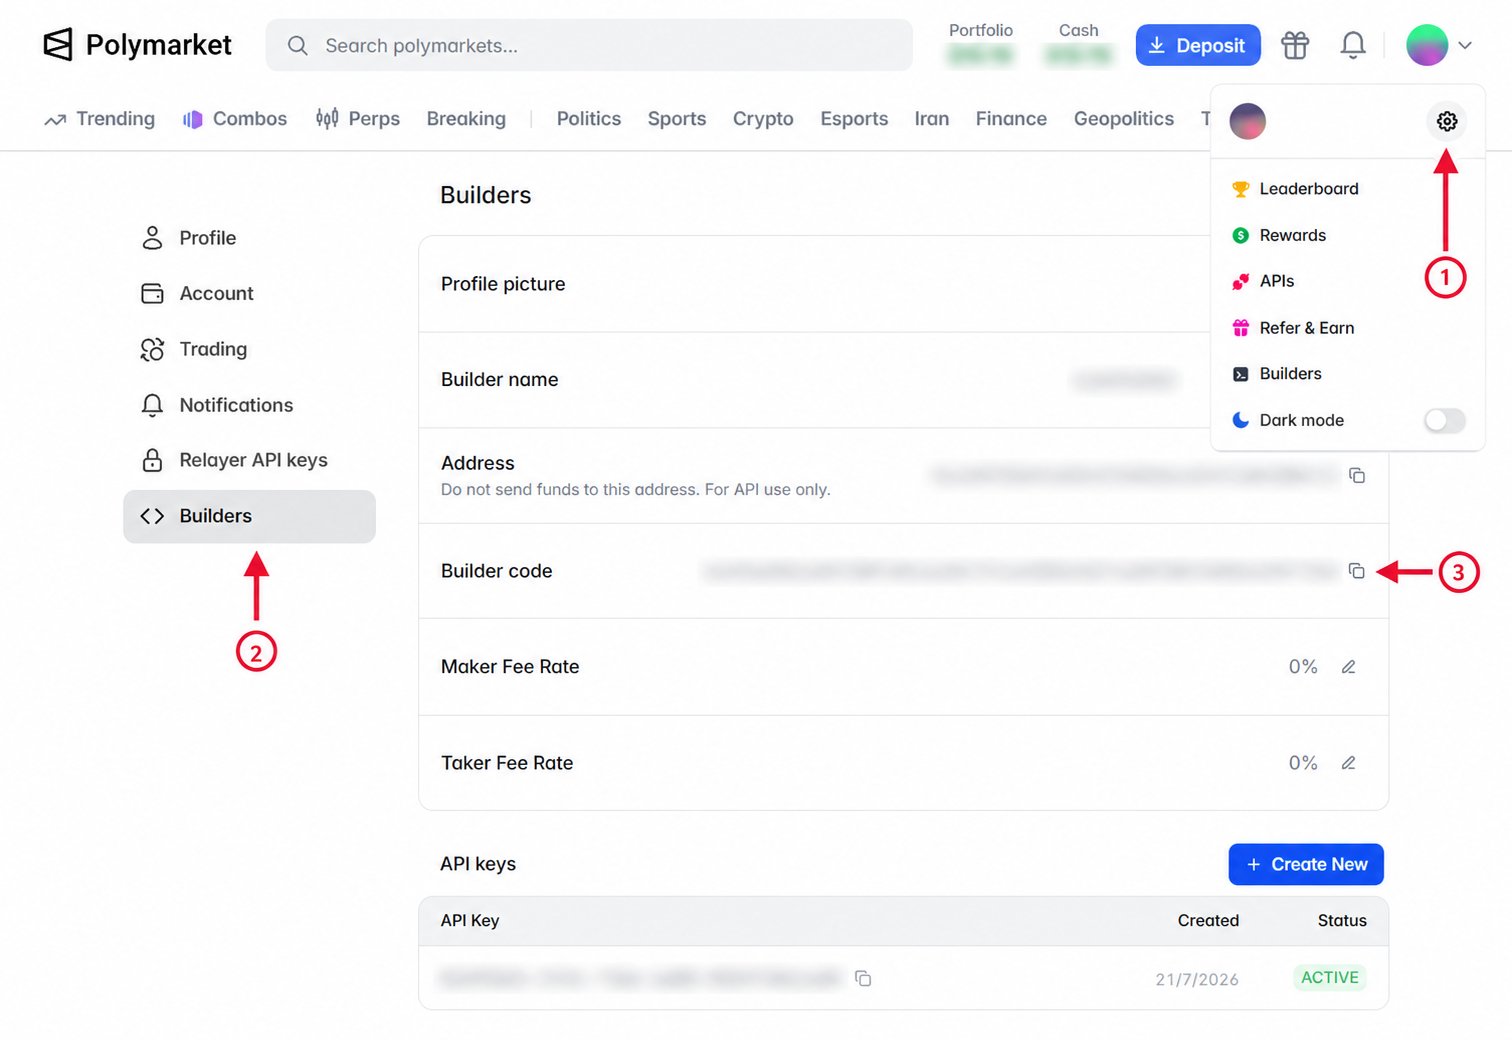 在每个希望归因到你的集成的订单中包含构建者代码。由于它是已签名订单的一部分,
请在签名前添加。
给定一个 `SecureClient`,下单时通过 `builderCode` 传入该代码:
```ts theme={null}
const response = await client.placeLimitOrder({
tokenId: yesTokenId,
side: OrderSide.BUY,
price: "0.52",
size: "10",
builderCode: process.env.POLYMARKET_BUILDER_CODE,
});
// response: OrderResponse
```
给定一个 `AsyncSecureClient`(同步代码使用 `SecureClient`),下单时通过
`builder_code` 传入该代码:
```python theme={null}
response = await client.place_limit_order(
token_id=yes_token_id,
side="BUY",
price="0.52",
size="10",
builder_code=os.environ["POLYMARKET_BUILDER_CODE"],
)
# response: OrderResponse
```
签名前,将订单结构的 `builder` 字段设为你的构建者代码,以替代默认的 32 字节零值。
该代码会成为已签名订单的一部分,并将由此产生的交易归因到你的构建者资料。
```json theme={null}
{
"deferExec": false,
"order": {
"builder": "",
"…": "…"
},
"orderType": "GTC",
"owner": ""
}
```
### 验证归因
归因订单撮合后,使用构建者代码查询构建者交易,以确认该交易已计入你的资料。
尚未撮合的订单不会出现在构建者交易结果中。
通过 `PublicClient` 或 `SecureClient` 使用 `listBuilderTrades`,
然后获取匹配交易的第一页:
```ts theme={null}
const pages = client.listBuilderTrades({
builderCode: process.env.POLYMARKET_BUILDER_CODE,
});
const page = await pages.firstPage();
// page.items: BuilderTrade[]
```
通过 `AsyncPublicClient` 或 `AsyncSecureClient` 使用 `list_builder_trades`,
然后获取匹配交易的第一页。同步 `PublicClient` 和 `SecureClient` 提供相同的方法。
```python theme={null}
pages = client.list_builder_trades(
builder_code=os.environ["POLYMARKET_BUILDER_CODE"],
)
page = await pages.first_page()
# page.items: tuple[BuilderTrade, ...]
```
构建者交易是公开读取,无需身份验证标头:
```bash theme={null}
curl "https://clob.polymarket.com/builder/trades?builder_code=$POLYMARKET_BUILDER_CODE"
```
使用响应中的 `next_cursor` 值请求后续页面。
你还可以在[构建者排行榜](https://builders.polymarket.com)上监控已计入的交易量。
已撮合交易量最多可能需要 24 小时才会显示。
在每个希望归因到你的集成的订单中包含构建者代码。由于它是已签名订单的一部分,
请在签名前添加。
给定一个 `SecureClient`,下单时通过 `builderCode` 传入该代码:
```ts theme={null}
const response = await client.placeLimitOrder({
tokenId: yesTokenId,
side: OrderSide.BUY,
price: "0.52",
size: "10",
builderCode: process.env.POLYMARKET_BUILDER_CODE,
});
// response: OrderResponse
```
给定一个 `AsyncSecureClient`(同步代码使用 `SecureClient`),下单时通过
`builder_code` 传入该代码:
```python theme={null}
response = await client.place_limit_order(
token_id=yes_token_id,
side="BUY",
price="0.52",
size="10",
builder_code=os.environ["POLYMARKET_BUILDER_CODE"],
)
# response: OrderResponse
```
签名前,将订单结构的 `builder` 字段设为你的构建者代码,以替代默认的 32 字节零值。
该代码会成为已签名订单的一部分,并将由此产生的交易归因到你的构建者资料。
```json theme={null}
{
"deferExec": false,
"order": {
"builder": "",
"…": "…"
},
"orderType": "GTC",
"owner": ""
}
```
### 验证归因
归因订单撮合后,使用构建者代码查询构建者交易,以确认该交易已计入你的资料。
尚未撮合的订单不会出现在构建者交易结果中。
通过 `PublicClient` 或 `SecureClient` 使用 `listBuilderTrades`,
然后获取匹配交易的第一页:
```ts theme={null}
const pages = client.listBuilderTrades({
builderCode: process.env.POLYMARKET_BUILDER_CODE,
});
const page = await pages.firstPage();
// page.items: BuilderTrade[]
```
通过 `AsyncPublicClient` 或 `AsyncSecureClient` 使用 `list_builder_trades`,
然后获取匹配交易的第一页。同步 `PublicClient` 和 `SecureClient` 提供相同的方法。
```python theme={null}
pages = client.list_builder_trades(
builder_code=os.environ["POLYMARKET_BUILDER_CODE"],
)
page = await pages.first_page()
# page.items: tuple[BuilderTrade, ...]
```
构建者交易是公开读取,无需身份验证标头:
```bash theme={null}
curl "https://clob.polymarket.com/builder/trades?builder_code=$POLYMARKET_BUILDER_CODE"
```
使用响应中的 `next_cursor` 值请求后续页面。
你还可以在[构建者排行榜](https://builders.polymarket.com)上监控已计入的交易量。
已撮合交易量最多可能需要 24 小时才会显示。